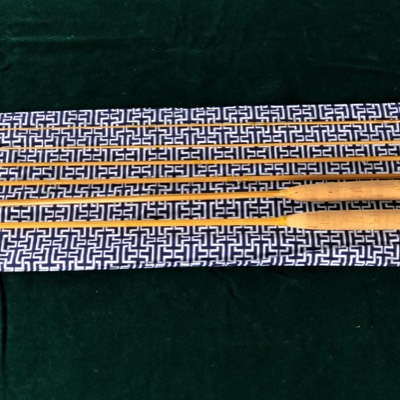
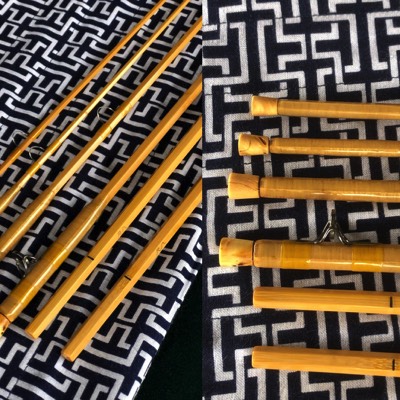
Bamboo Sleeve Ferrules
Nickel Silver ferrules have stood the test of time, and hold their position rightfully as the standard for classic bamboo rods. They look traditional, are functional, and properly cared for, will last the life of the rod with minimal maintenance. The actions and tapers of most classic bamboo rods have evolved to factor in the weight of metal ferrules. This weight isn't of itself a bad thing. After all, the weight of the actual bamboo is considered one of its desirable qualities in regard to rod action. In many cases, metal ferrules can contribute to the "self loading" of a rod action. So for me, metal ferrules are important in my current rodmaking, and I expect that to continue into the future.
Having said that, over the last few years I've been experimenting with bamboo ferrules on a range of rods, and I believe that there is definitely a place for them on some bamboo rods. The light weight and flexibility of properly constructed bamboo ferrules can remove the weight constraints of metal ferrules, and open up a range of options for new rod designs. These include longer single handed rods (over 8 feet), switch and trout spey rods, low modulus Madake bamboo rods, multi piece (4 piece and up) rods, and certain other adapted tapers.
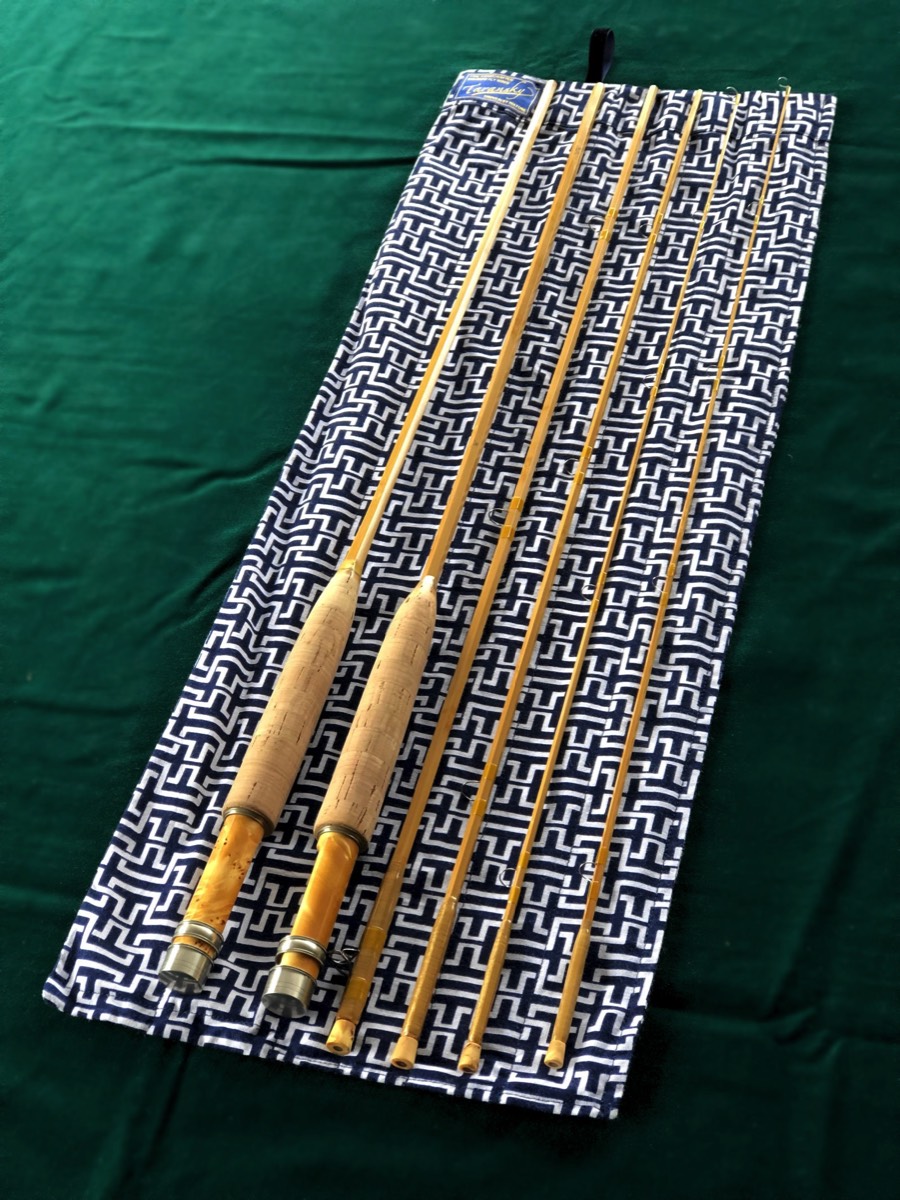
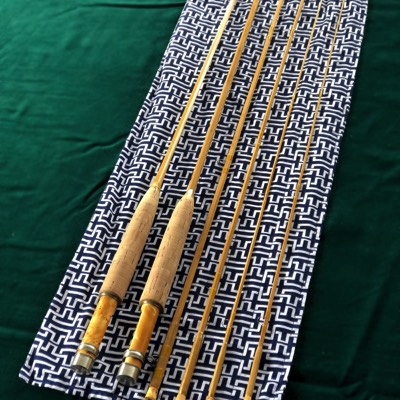
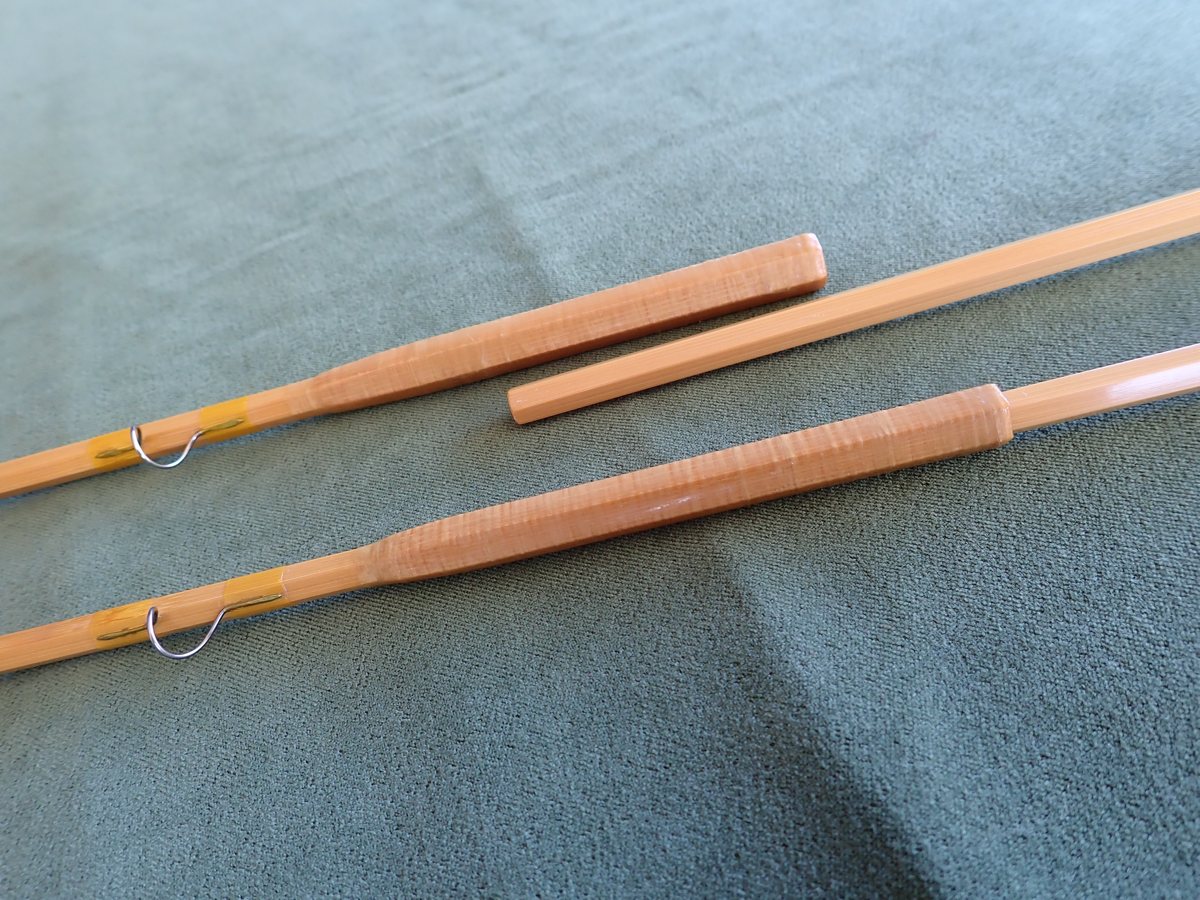
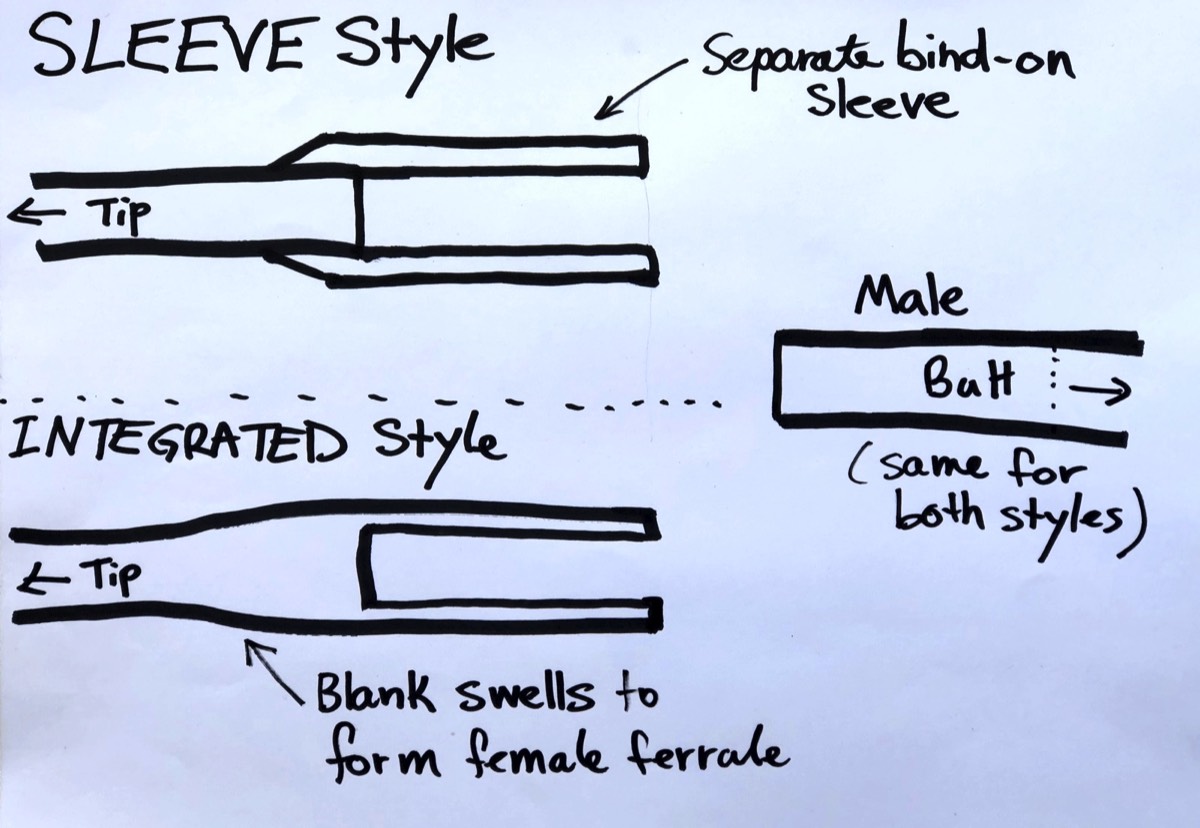
There are two styles of bamboo ferrule - the "Sleeve" style and the "Integrated" style. As the name suggests, the "Sleeve" style is formed from a separate hollowed sleeve of hex bamboo which is then attached to the blank. This is in contrast to the "Integrated" style, where the actual blank is swelled and then hollowed inside the swell to form the ferrule. Both styles can produce a functional ferrule. I've made rods using both styles, but currently I am making sleeve style, tip over butt configuration, reinforced with over wrapping of kevlar floss (and/or silk). I like the sleeve style as they are simple to produce, can be replaced easily in the event of breakage, and result in a compact, slim design which is pleasing aesthetically and has minimal impact on the rod action.
DIAGRAM 1
Sleeve Style and Integrated Ferrule Design
This article details my current method for constructing Sleeve style ferrules (tip over butt, with the Female ferrule on the upper/ip section). At the end of the article I have included some discussion on some lessons learned from failures and other experiences, and possible directions for future developments. My approach is based on information from a number of sources, including articles and meeting with from Japanese Master maker Ushu Nakamura. I've also discovered and incorporated some elements of my own through my own experiences.
The aim has been to produce a reliable ferrule which is:
- Strong, both through the ferrule and in the blank adjacent to the ferrules
- Easy to engage, and easy to separate
- Minimal/elegant aesthetically
- Lightweight
- Flexible, with minimal impact on rod action
- Possible to replace or repair on breakage or failure
In terms off a procedure, the goal was for it to be simple, repeatable and time effective, while satisfying the above criteria. After making a number of rods in both 2 and 4 piece configuration, I'm happy withe the current results, though there is still scope for further development. They are not difficult to make or fit, though are a little fiddly to begin with. After making 8-10 rods with these ferrules I feel that the time to make and fit them is around the same as prepping and fitting a set of metal ferrules.
A worked example is included through the article to help to demonstrate the procedure. The worked example is for a 2 piece, 8 foot rod based on a Paul Young Para 15.
DIAGRAM 2
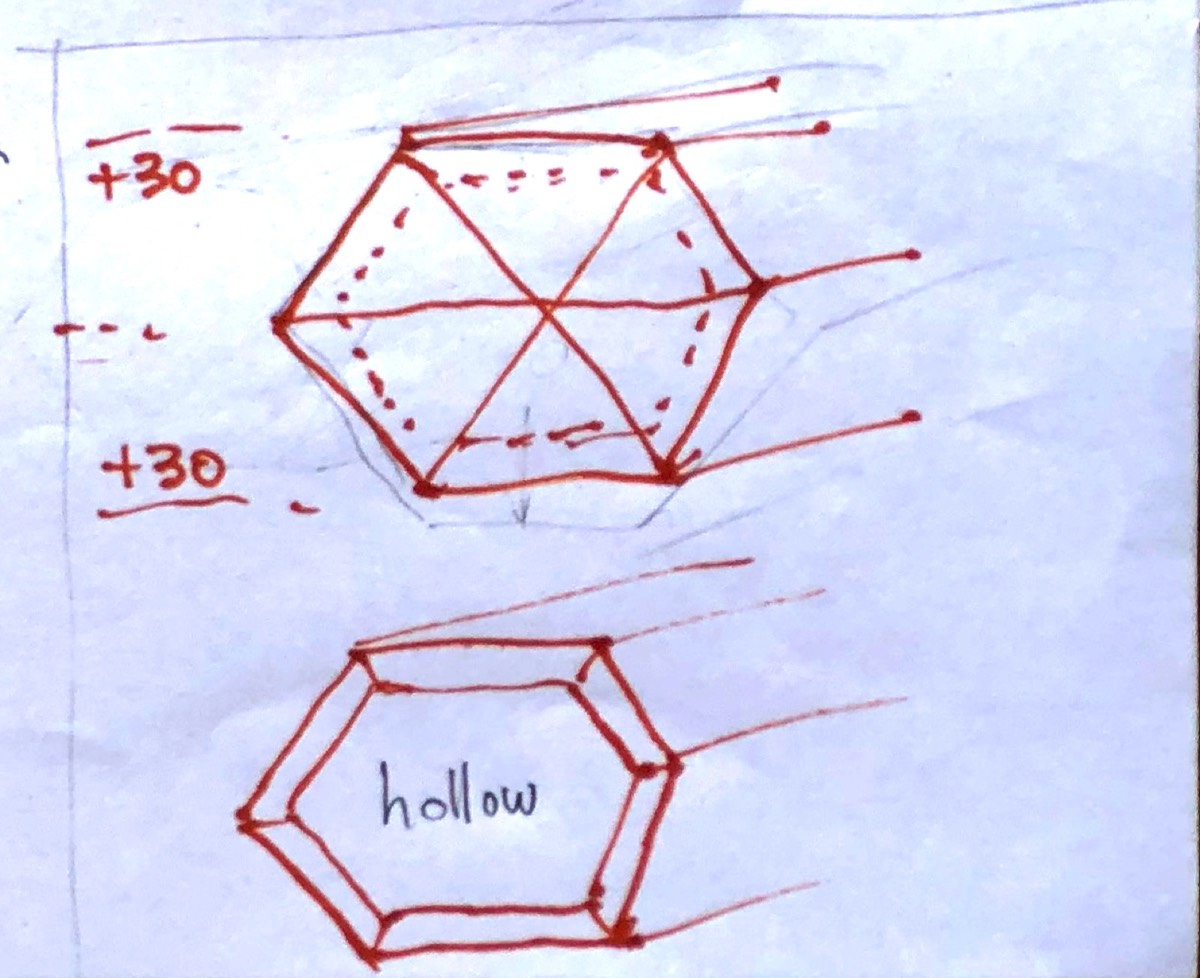
Sleeve Style Design Overview and Terminology
Below is a diagram showing the basic cross section anatomy of a bamboo sleeve ferrule, with some terminology. The diagram and terminology refers to a 2 piece rod design, but the process is the same for rods made with more than 2 sections.
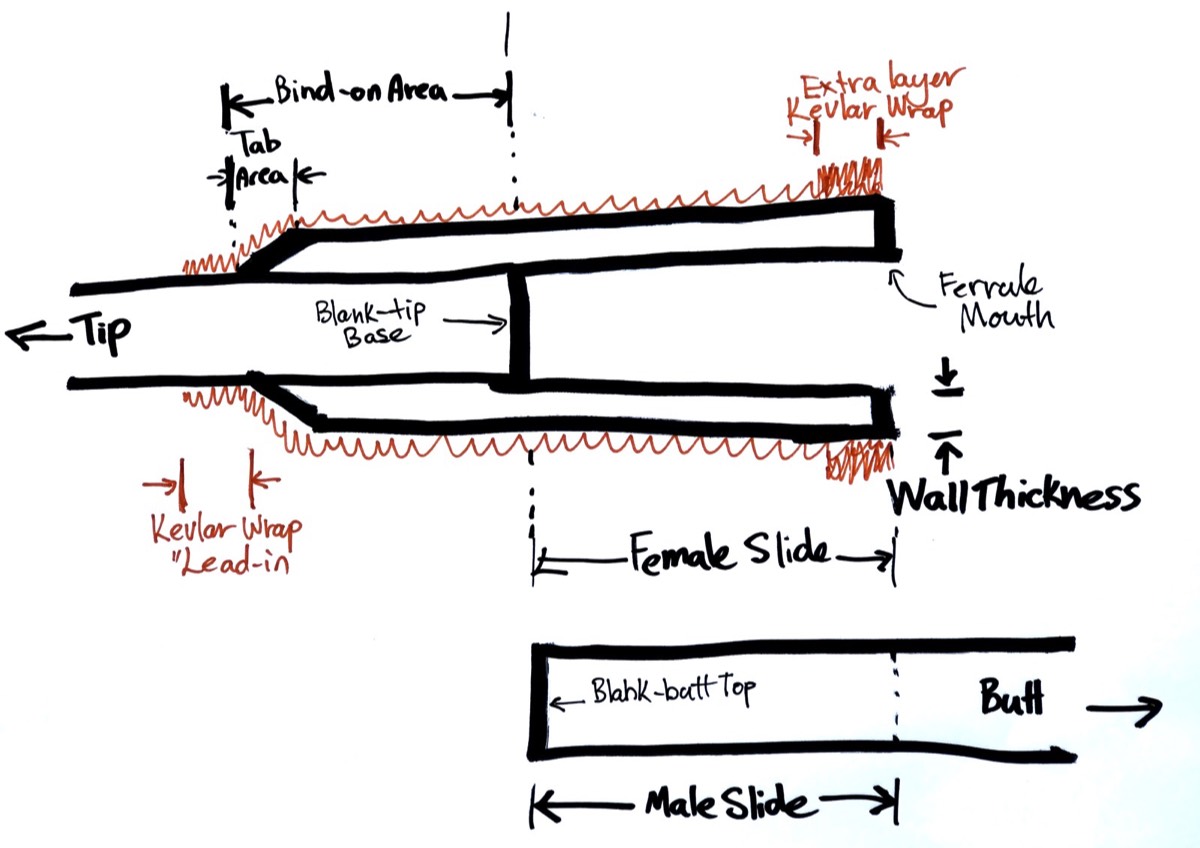
Blank-tip Base
The base (bottom) of the blank tip-section. It forms the inside "end" of the Female ferrule, where the Blank-butt Top will meet when the Male is fully seated.
Bind-on Area
The are where the Female ferrule is bound onto the tip of the blank (where the Female ferrule and blank tip section overlap)
Tab Area
The part of the Bind-on Area of the female ferrule which has been shaped (sanded/filed) to form a smooth, sloped transition onto the blank. This provides a "shoulder" which allows the Kevlar to be wrapped up and down from the blank onto the female ferrule
Kevlar-wrap "Lead-in"
The short area on the tip of the blank, immediately adjacent to the Tab Area, where the Kevlar wrap continues to further transition the ferrule from the Tab Area to the blank.
Female Slide (Slide Length)
The open length of the Female ferrule where the Male will be inserted. (It is the same length as the Male Slide).
Ferrule Mouth
The "opening" of the female ferrule, where some additional turns of Kevlar are wrapped for enhanced strength.
Wall Thickness
The thickness (in thou) of the Female ferrule. This corresponds to the additional amount added to the planing form settings when planing the strips to make the Female ferrule.
Blank-butt Top
The top of the blank butt section. This forms the "end" of the Male ferrule, which meets up with the Blank-tip Base when the ferrule is fully engaged.
Male Slide (Slide Length)
The length of the Blank-butt Top which seats inside the Female ferrule when fully inserted. (It is the same length as the Female Slide)
TABLE 1
SUGGESTED FERRULE DIMENSIONS
A range of values are acceptable for the ferrule length (bind-on length and slide length), and wall thickness, depending on the size of the rod. The figures below are given as a guide, for 3 ferrules on a 4-piece rod.
There is scope for reduction in these values. I've made ferrules with shorter bind-on and slide lengths, and thinner walls, down to 20 thou, but the suggestions below are a starting point and have resulted in resilient ferrules.
| Total Length (inches) | Bind-on Length (inches) | Slide Length (inches) | Wall Thickness (thou) | |
| Light Trout Up to #4 | ||||
| Top Ferrule | 2 | 3/4 | 1 1/4 | 25 |
| Mid Ferrule | 2 3/8 | 7/8 | 1 1/2 | 30 |
| Bottom Ferrule | 2 3/4 | 1 | 1 3/4 | 35 |
| Medium Trout #5-6 | ||||
| Top Ferrule | 2 3/8 | 7/8 | 1 1/2 | 30 |
| Mid Ferrule | 2 3/4 | 1 | 1 3/4 | 35 |
| Bottom Ferrule | 3 1/4 | 1 1/4 | 2 | 40 |
| Switch/ Trout Spey | ||||
| Top Ferrule | 3 | 1 | 2 | 35 |
| Mid Ferrule | 3 1/2 | 1 1/4 | 2 1/4 | 40 |
| Bottom Ferrule | 4 1/4 | 1 1/2 | 2 3/4 | 45 |
Part 1. Rod Section Length Calculations
The first step for planning the rod is to work out the section lengths for the blank. The goal here is to make a rod of the intended length, with all sections the same length after the ferrules, hardware and guides are mounted. So before making and cutting your blank, or making the actual ferrules, you need to decide at the very least the Slide Length of the ferrule(s) that you plan to use (see Table 2 above). You need this information to work out your section lengths and taper layout.
Rod Section Lengths - Intuitive explanation…
Consider a 2 piece rod… As a starting point, imagine cutting each of the blank sections to exactly half the intended rod length (disregarding the length added by the tiptop and butt cap for the time being). When assembled, The bottom of the tip will meet up with the top of the butt of the blank, and the rod will be the correct length. But the female ferrule will increase the final section length of the tip by the slide length. So to keep the tip and but sections equal, you could cut the tip section shorter by the length of the ferrule slide. But now when the rod is assembled, it will be shorter by the amount of the ferrule slide length. So we add HALF the ferrule slide length to both the tip of the butt. Now we have the section lengths equal, with the ferrule mounted, and the assembled rod will be the intended length. There are two final minor adjustments that we need to make. For the tip, we need to make the section shorter by the amount that will be added by the tiptop guide. And for the butt, we need to make the section shorter by the thickness of the butt cap.
The general principal is the same for multipiece rods. For each section, subtract the length added by the slide length of the ferrule mounted on that section. But then add an equal "share" of that ferrule slide length to each of the rod sections to "regain" the rod length that you have removed from that one section. So for a 3 piece rod, you will add one-third of the slide length of the ferrule to each of the sections. And on a 4 piece rod you will add one-quarter of the slide length to each section. You do this for each ferruled section. And then finally do the same adjustment for the tiptop guide on the tip section and the butt cap thickness on the butt section.
(The same results can be derived using simultaneous equations, but hopefully the intuitive explanation makes sense). Either way, we end up with these formulas for section length calculations:
Formulas for 2 piece rod
T = R/2 - S/2 - t
B = R/2 + S/2 - b
Where:
R = Finished Rod length
T = Blank Tip length
B = Blank Butt length
S = Ferrule Slide length
t = Length added by Tiptop guide
b = Length added by Butt Cap thickness
Formulas for 3 piece rod
T = R/3 - 2*S1/3 + S2/3 - t
M = R/3 + S1/3 - 2*S2/3
B = R/3 + S1/3 + S2/3 - b
Where:
R = Finished Rod length
T = Blank Tip length
M = Blank Mid length
B = Blank Butt length
S1 = Top Ferrule Slide length
S2 = Bottom Ferrule Slide length
t = Length added by Tiptop guide
b = Length added by Butt Cap thickness
Formulas for 4 piece rod
T = R/4 - 3*S1/4 + S2/4 + S3/4 - t
U = R/4 + S1/4 - 3*S2/4 + S3/4
L = R/4 + S1/4 + S2/4 - 3*S3/4
B = R/4 + S1/4 + S2/4 + S3/4 - b
Where:
R = Finished Rod length
T = Blank Tip length
U = Blank Upper length (Second Section Down)
L = Blank Lower length (Third Section Down)
B = Blank Butt length
S1 = Top Ferrule Slide length
S2 = Mid Ferrule Slide length
S3 = Bottom Ferrule Slide length
t = Length added by Tiptop guide
b = Length added by Butt Cap thickness
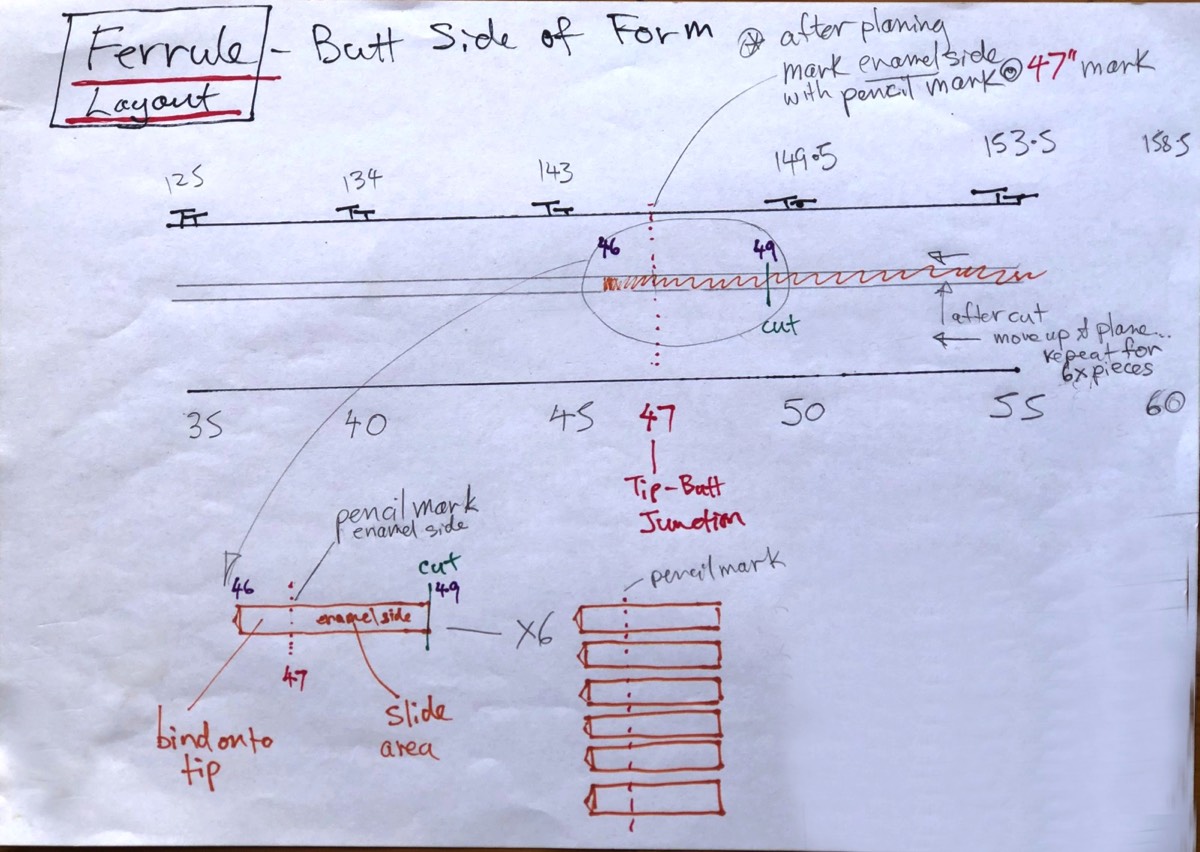
Rod Section Length Calculations
R = Finished Rod length = 96 inches
S = Ferrule Slide length = 2 inches
t = Length added by Tiptop guide = 0.375 inches
b = Length added by Butt Cap thickness = 0.1 inches
Formulas for 2 piece rod
T = R/2 - S/2 - t = 46.635 inches (** 47 inches prior to blank trimming for t)
B = R/2 + S/2 - b = 48.8 inches (** 49 inches prior to blank trimming for b)
** NOTE: The Tiptop addition length (t) and Butt Cap addition length (b) are trimmed from the blank later in the process, so for the purpose of laying out the taper, the "full" section lengths of 47 inches for the tip, and 49 inches for the butt will be used throughout the process until final trimming is required)
Part 2. Taper Layout
Once the section lengths for the blank have been calculated, the next step is to plan the layout of the taper as it relates to the sections.
With Metal ferrules, the fit is achieved in the metal to metal slide, and the bamboo is turned down to fit the inside of the ferrules with a parallel glued fit. This means that there is some leeway in the exact bamboo measurement at the ferrule stations. This means that you can set your station measurements for your ferrule station at the nearest inch station on your forms, and disregard section length trimming and the minor effect this will have on the exact flat to flat dimensions of the blank before turning down the blank to fit the ferrule. For example, a 7'6" 2-piece rod with size #13 ferrule (203 thou) will have "nominal" section lengths of 45 inches for both tip and butt. However, to keep the section lengths equal after the ferrules are mounted, the tip will really be more like 45 1/2 inches and the butt 44 1/2. You can still set your forms at the 45 inch mark of the tip, and start of the butt at the same 101.5 thou (2 X 101.5 = 203). If the tip is cut a little longer and is a thou or so over, it will be turned down to fit the inside of the make ferrule and won't matter at all in regard to the metal ferrules fitting.
But with a bamboo ferrule, we ideally want the taper to continue as close as possible from section to section, so we can get a perfect fit of the glued Bind-on Area to the tip, and Slide-Area to accomodate the Male-slide. As we've seen, because of the adjustments to section lengths caused by the slide lengths of the ferrules, the ferrule "stations" (ends of the blank sections) don't fall exactly on the equally divided section length measurements. For example, on an 8 foot (96 inch), 2 piece rod, with a 2 inch ferrule slide), the bottom of the tip section (and top of the butt section) meet at the 47 inch mark, rather than the half way point of 48 inches.
The simplest way I've found to lay the sections out and set the forms is to draw a "Map" of the fully assembled rod, noting at what point along the taper each of the sections start and end. On the taper sheet, record the taper all the way though from the tip to the butt, in 5 inch intervals, regardless of how many sections you are making the rod in. Then, when setting the forms, stick to the 5 inch form settings, and set a station or two above and below where the ferrules will be, at the section ends. Use your "Map" to mark on the forms where the section will end, and use that to lay out your sections. It's a good idea to take a photo of the forms with the markings on them, with a note of how much trimming overlap you will have on the glued up blank, too. This "Map" and layout on the forms will help you when you come to plane up your oversize pieces that will form your sleeve ferrules, as they relate to each other in the layout and location of the blank ends.
For 4-piece rods, you can make the sections as a 2 piece blank, and then carefully cut the sections in the right place to turn it into a 4-piece blank. The Map will help you plan these cuts. Of course if you are making a 4-piece with 2 tips, the 2 piece into 4 will only give you one tip, so you'll have to make up the extra one separately.
Because you will want to fit and tune the ferrules to the completed blank, it's a good idea to plane and glue up your blank sections before starting to make your ferrules.
DIAGRAM 3
Worked Example - 8 foot, 2-piece Para 15
The Diagram below shows the blank layout and ferrule overview for the Worked Example
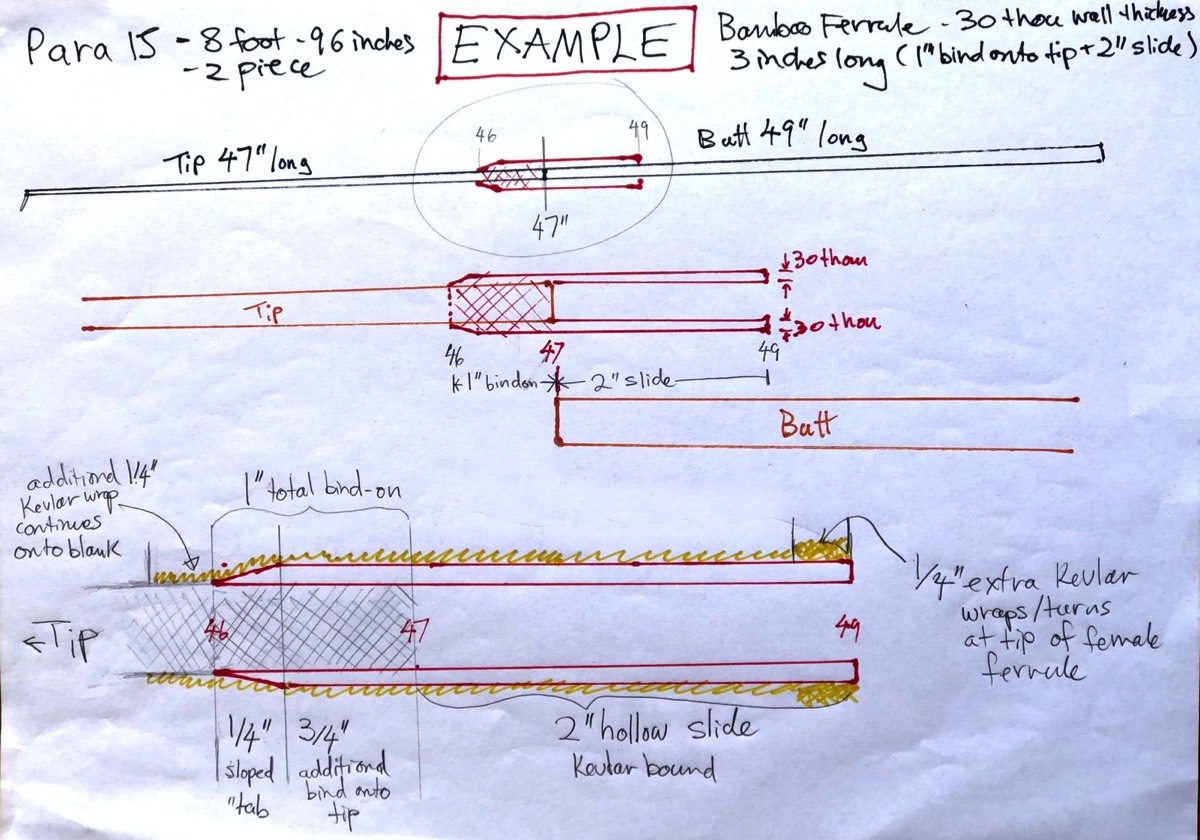
TABLE 2
Worked Example - 8 foot, 2-piece Para 15 Taper and Ferrule Dimensions
The Table below gives the taper and form settings for the 8 foot Para 15.
Options are included for both 30 thou and 40 thou ferrule wall thicknesses
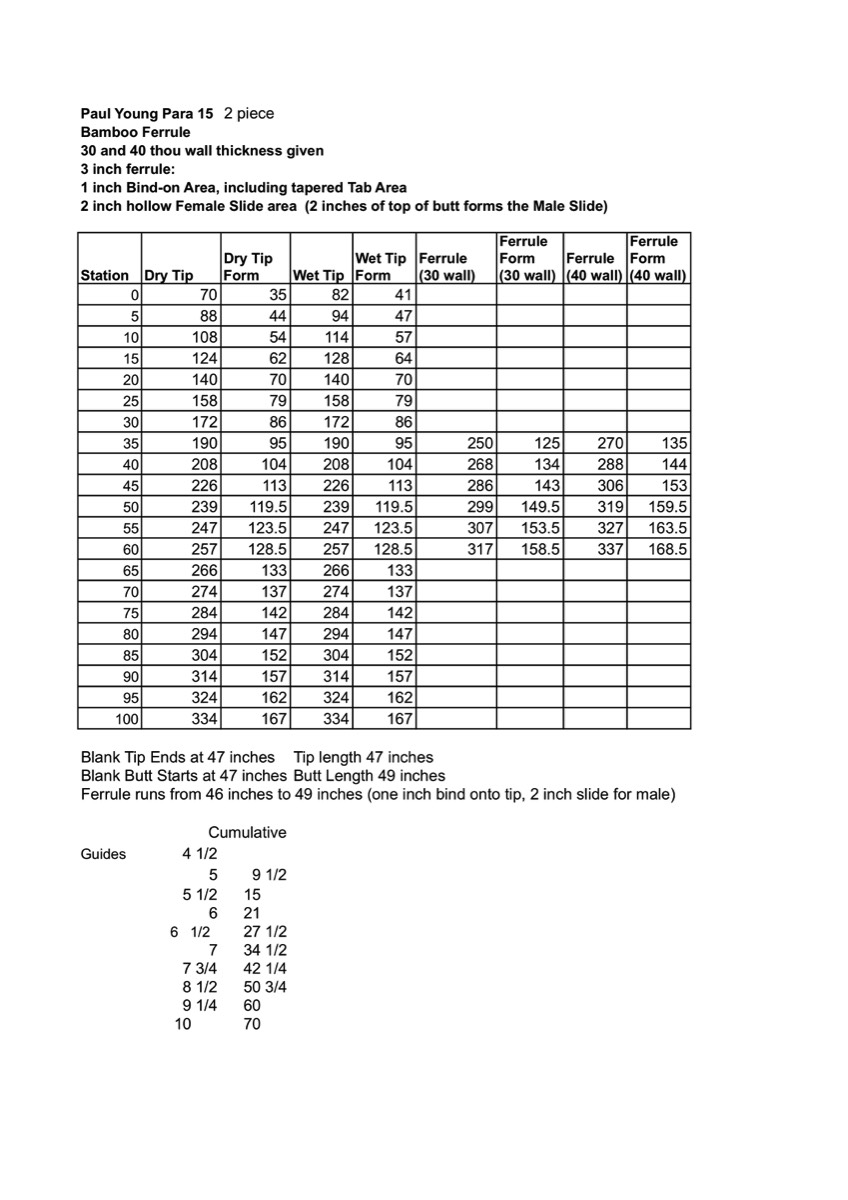
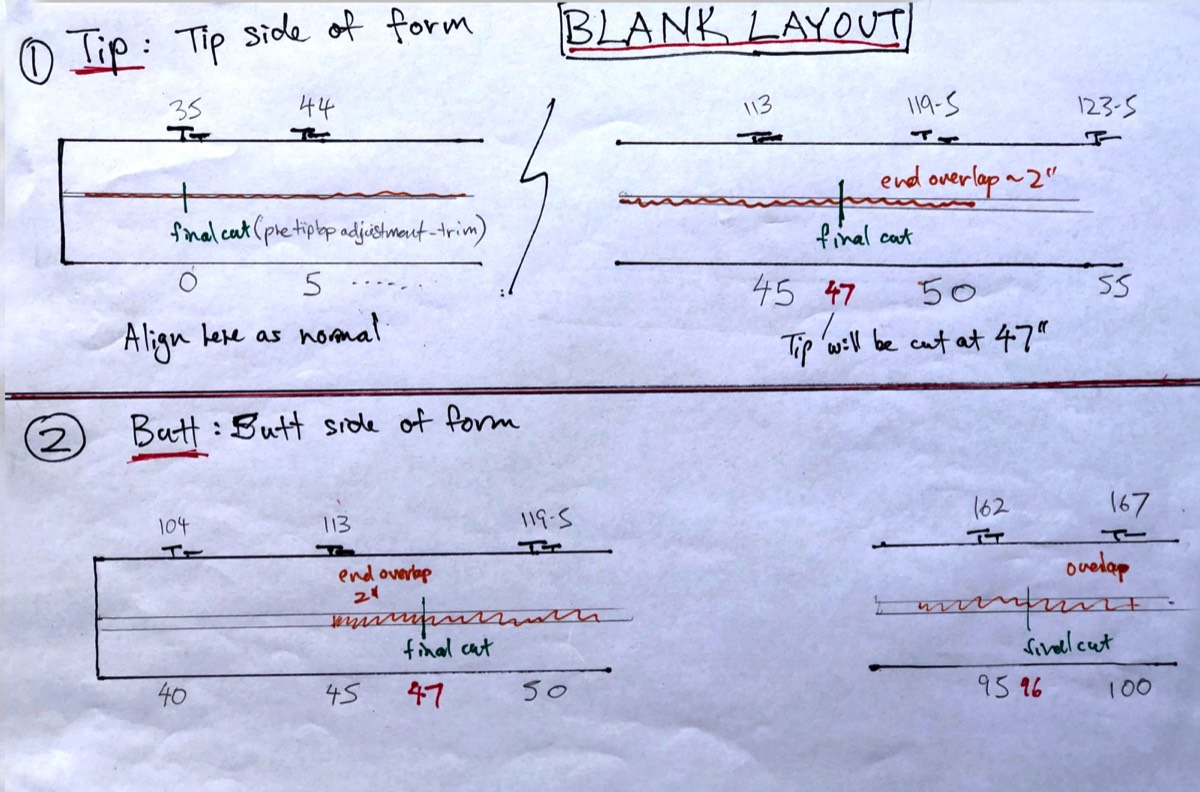
DIAGRAM 4
Worked Example - 8 foot 2 piece Para 15
Form Layout for Blank Sections
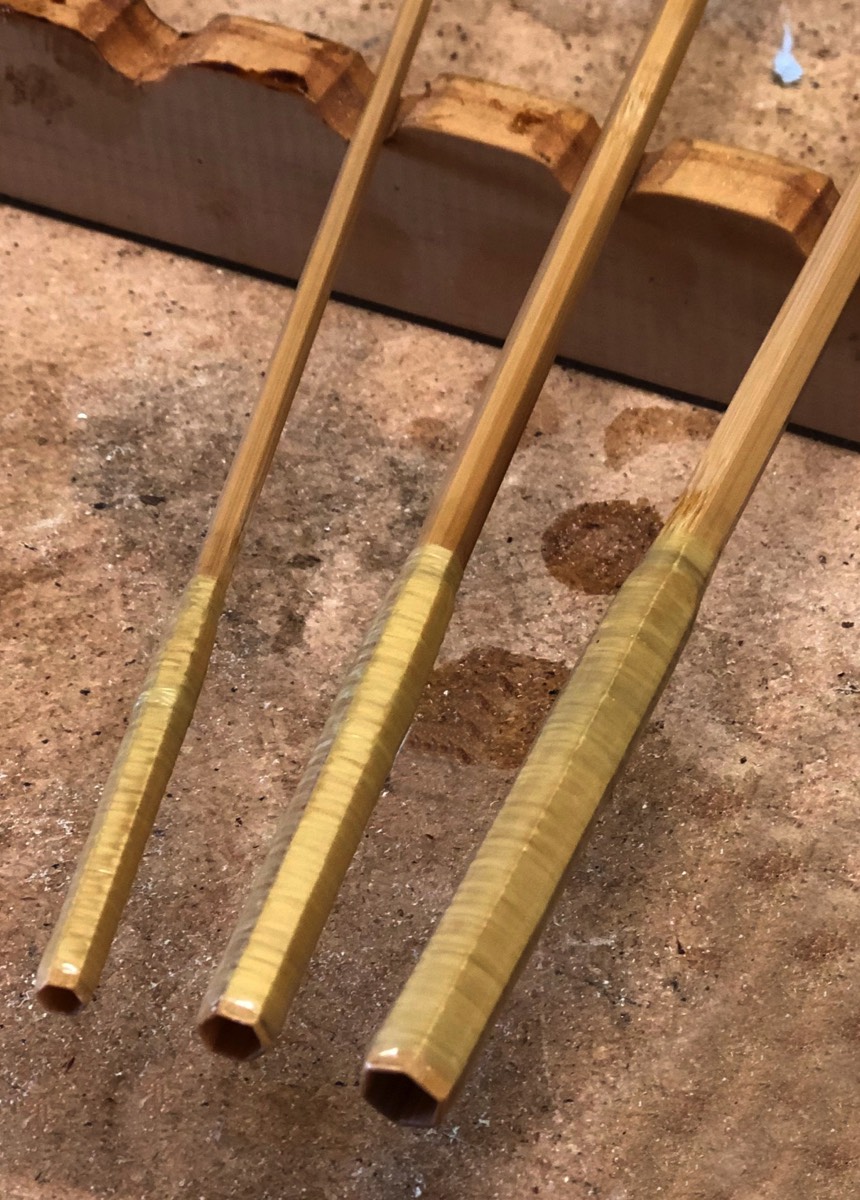
Part 3. Making the Ferrules - OVERVIEW
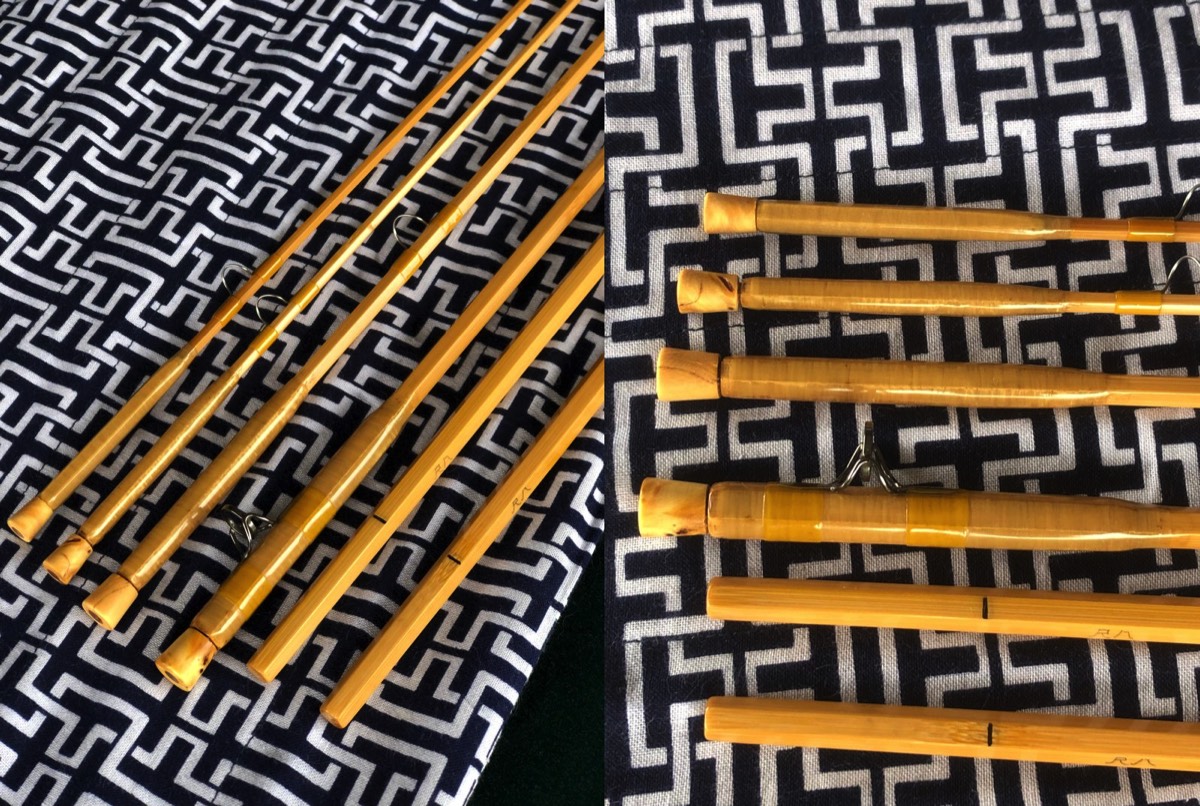
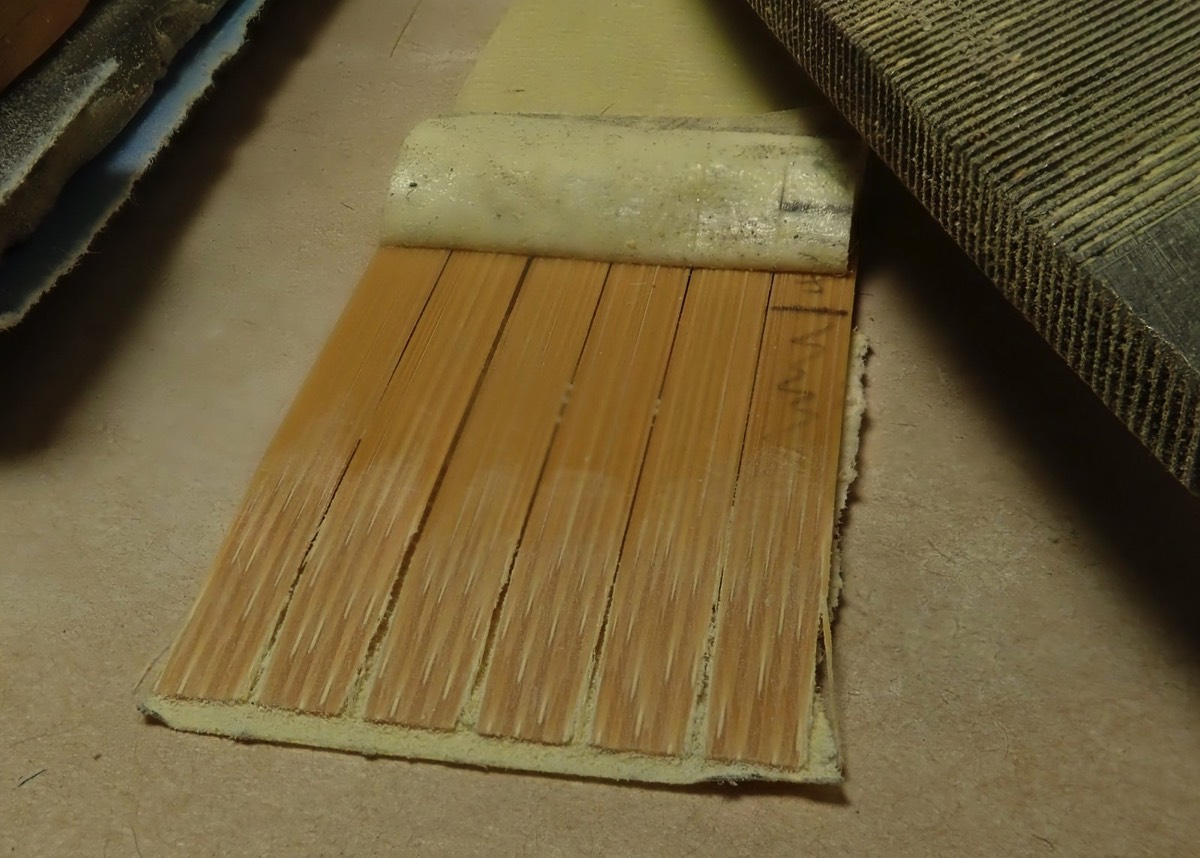
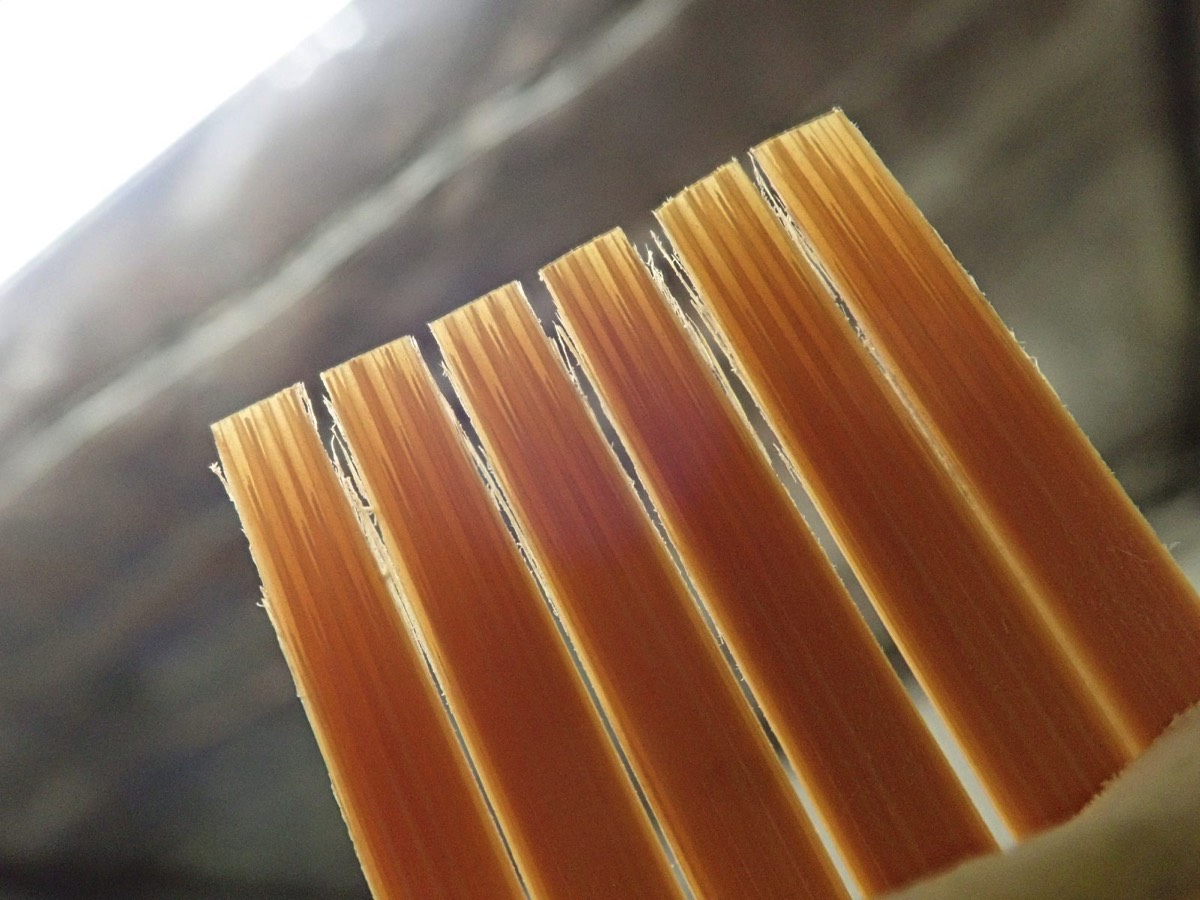
The sleeve ferrule is made by planing up a short, unglued hexagonal blank section. It is made oversized (by the "Wall Thickness") compared to the rod taper, overlapping where the sections (Blank-tip Base and Blank-butt Top) meet. The solid strips in the mini "ferrule blank" then have the inner (pith) apexes removed to form a hollow hex blank. This becomes the sleeve ferrule. The hollowing is performed until the inside of the ferrule matches the outside taper of the rod blank sections where they will join. The upper overlap (Bind-on Area) of the ferrule is bound and glued to the bottom of the tip blank section, and the lower overlap is kept hollow and becomes the Female-slide Area to house the Male-slide Area of the top of the butt section.
DIAGRAM 6
Worked Example - 8 foot 2 piece Para 15
Ferrule Hollowing/Preparation
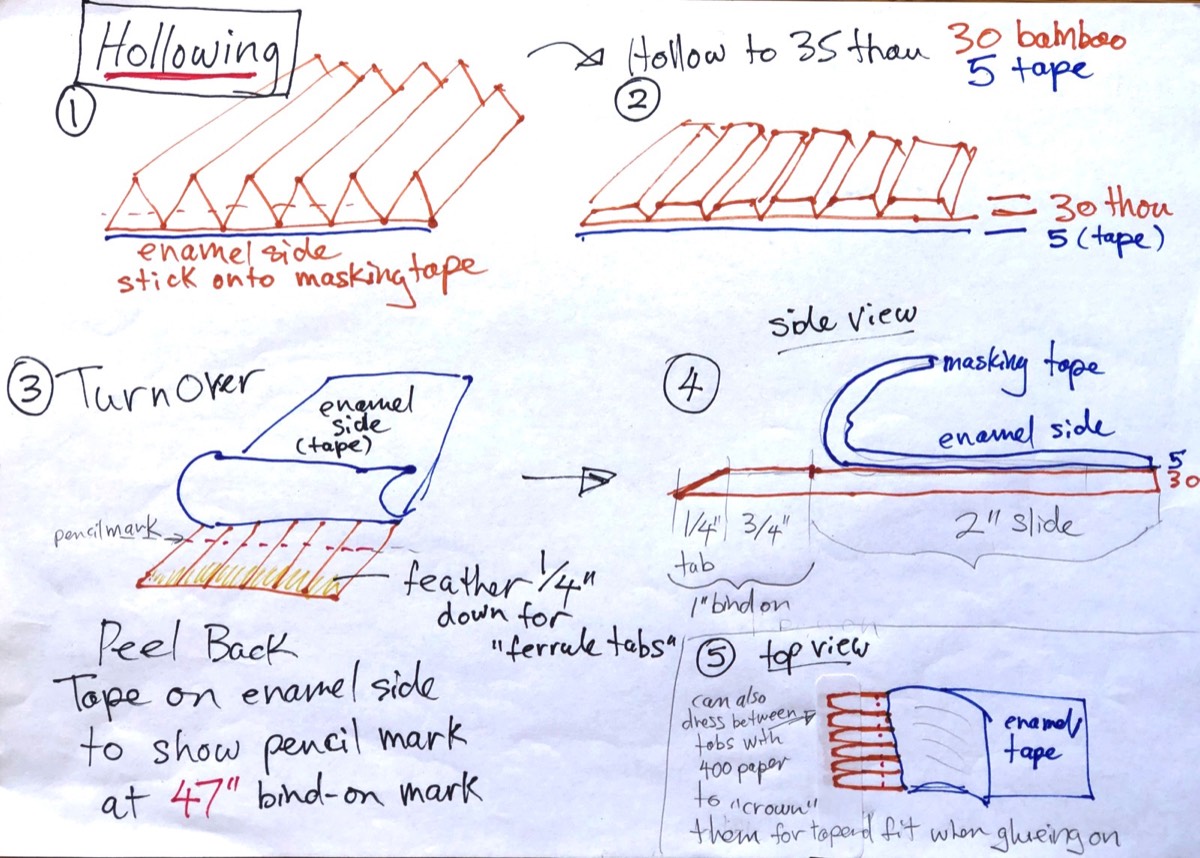
DIAGRAM 7
Worked Example - 8 foot 2 piece Para 15
Ferrule, 30 thou wall thickness, before and after hollowing
Part 4. Making the Ferrules - Ferrule Layout and Planing
Using the values in TABLE 1 as a guide, choose the dimensions of your ferrule(s). The total ferrule length will be made up of the Bind-on Area length that will be glued to the upper blank section (Tip), and the Female Slide length that will be hollow for accomodation the top of the lower blank section (Butt). You'll also need to decide on the Wall Thickness of the ferrule.
Layout and Form Setting
Because the ferrules will be 20-40 thou larger than the actual blank, it's nearly always more practical to make the ferrules on the butt side of the forms, with the deeper grooves.
The ferrule layout on the planing forms will match the layout used when you planed up the rod sections, (where the Blank-tip Base and Blank-butt Top meet). The only difference will be that the forms will need to be set larger (deeper) by the planned Wall Thickness of the ferrule. The demarcation point on the ferrule between the Bind-on Area and the start of the hollowed Female Slide area will line up exactly on the forms with the endpoint (cut line) of the rod sections (the Blank-tip Base and Blank-butt Top). The diagram and photo below show the layout on the forms for the Worked example.
The ferrules will be very short (around 3 inches long), so depending on the section layout, the whole ferrule will likely fit between two 5-inch stations on the forms, or at most span across two stations, so that only the station above and below would be needed to set the appropriate taper for the ferrule. Despite this, to avoid stressing the forms, and to ensure as close as possible correlation to the underlying rod taper, it is a good idea to set at east 2 stations above and below the ferrule location with the Wall Thickness "expanded" ferrule taper. Additionally, below the lowest station accurately set, the forms should be set with increasing depth for the remaining stations below this (as is usually done when planing normal rod sections). TABLE 2 provides the form settings for both a 30 thou and 40 thou wall thickness for the worked example.
When the forms have been set to the planned ferrule dimensions, mark a line across the forms where the Bind-on Area ends and the Slide area begins. Make another line across the forms above this which marks the top end of the ferrule (the top end of the Bind-on Area, where the ferrule transitions to the blank tip (at the top end of the ferrule Tab Area). And then make a third mark across the forms which marks the bottom end of the ferrule (Ferrule Mouth). This means that you will have marks for the endpoints of the ferrule, plus a mark at the Bind-on to hollow slide demarcation. You're now ready to start planing the strips to make up the ferrules.
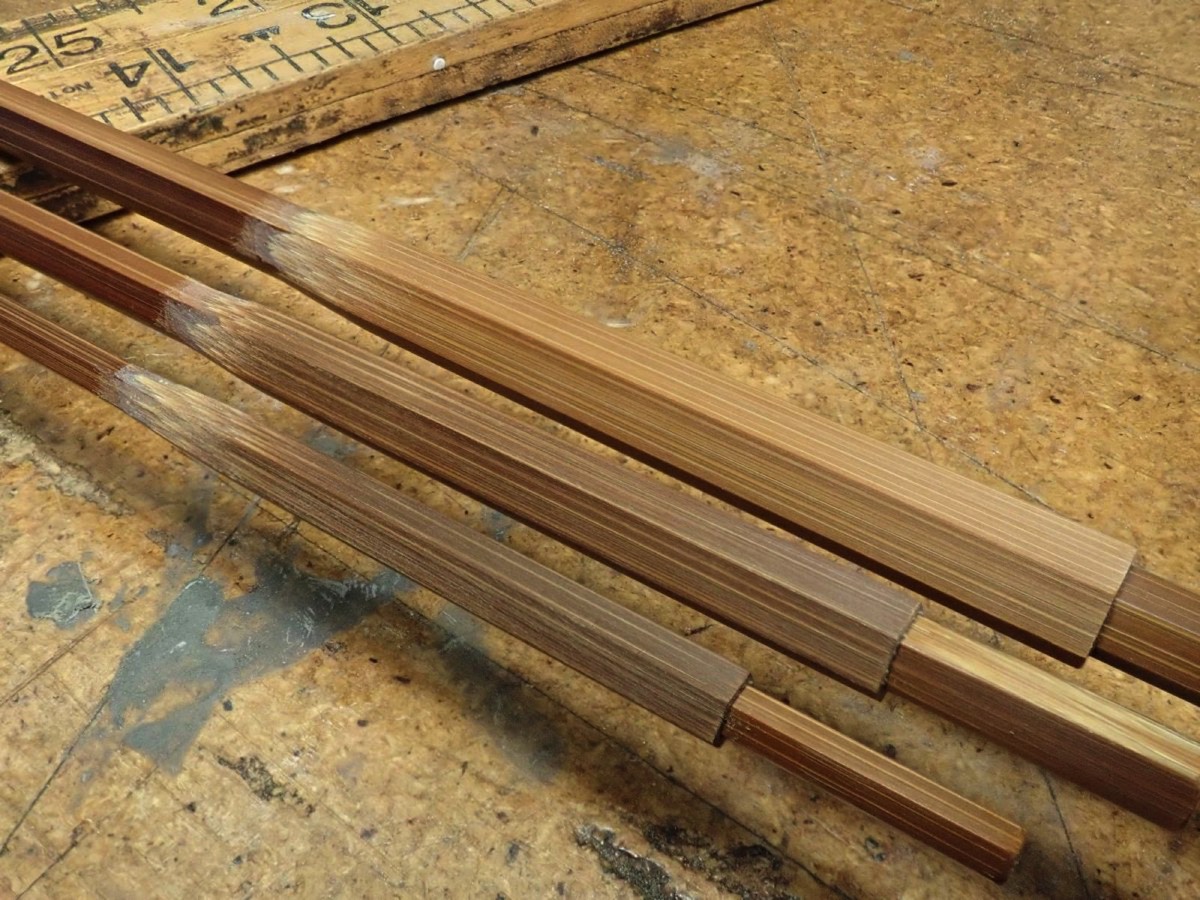
What strips to make the ferrules out of…
When making a rod, there are often leftover strips at the end of the process. Additionally, from time to time a flaw will be found part way along an otherwise good strip that makes it unusable in a full length section. The good news is that because only 3 inches so if bamboo are needed make a ferrule section, these leftover strips are perfect for making up ferrules. Even better if they are already roughed out to a triangular cross section spline. You can work around imperfections and nodes easily and plane up ferrule sections very quickly. As long as the colour matches the blank and good bamboo is going into the ferrule that's all that matters. Of course, if you need to prepare strips from scratch, that's fine, but using leftover strips/splines means that half the job is done. It also reduces wastage and the recovers time spent preparing those strips before they were discarded.
When it comes to the process of planing, of course it's not possible to plane a 3 inch long strip. There is no room to clamp or hold the strip while planing it. The most efficient process is as follows.
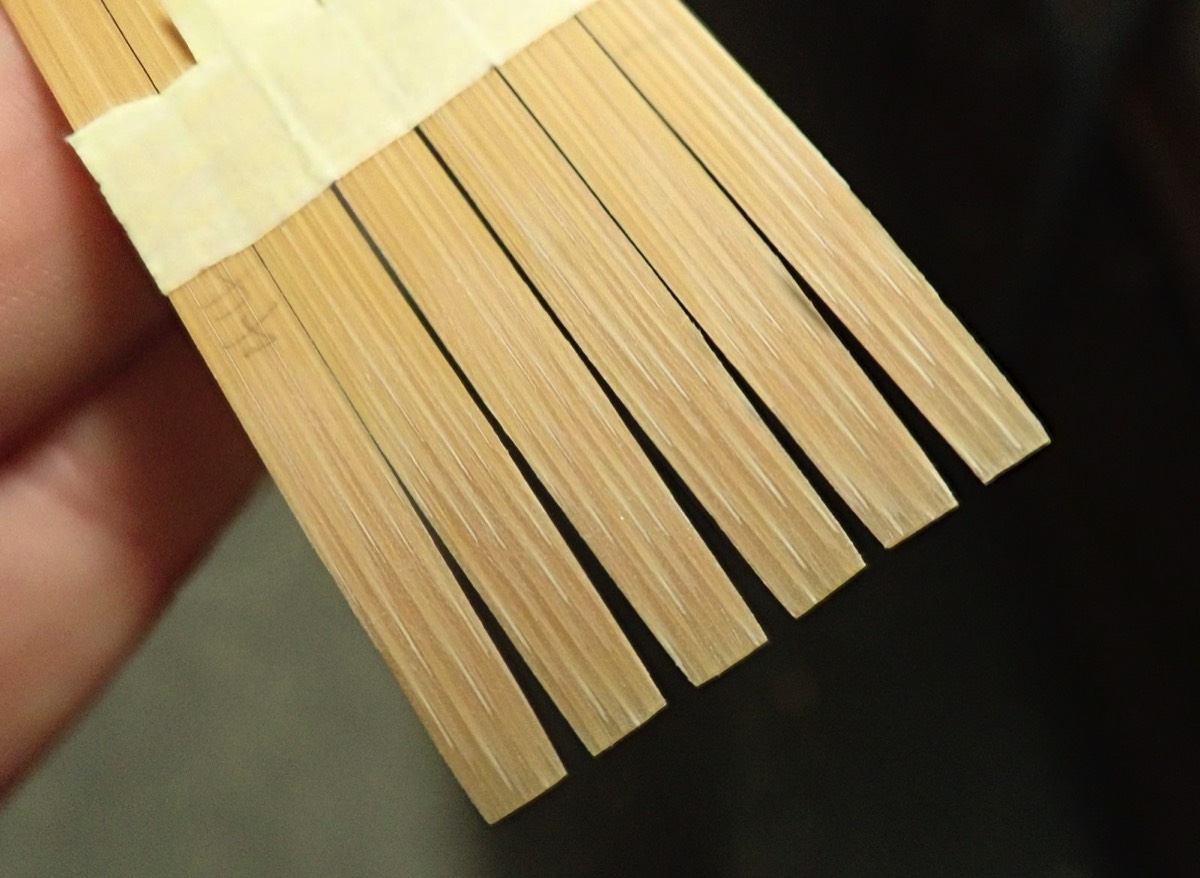
- Take as long a roughed out strip (spline) as you can that will fit on the forms, and has "good cane" at the top end long enough to form the ferrule. Make sure that the top end of the spline is trimmed clean and straight across (this will form the top "Tab" end of the ferrule).
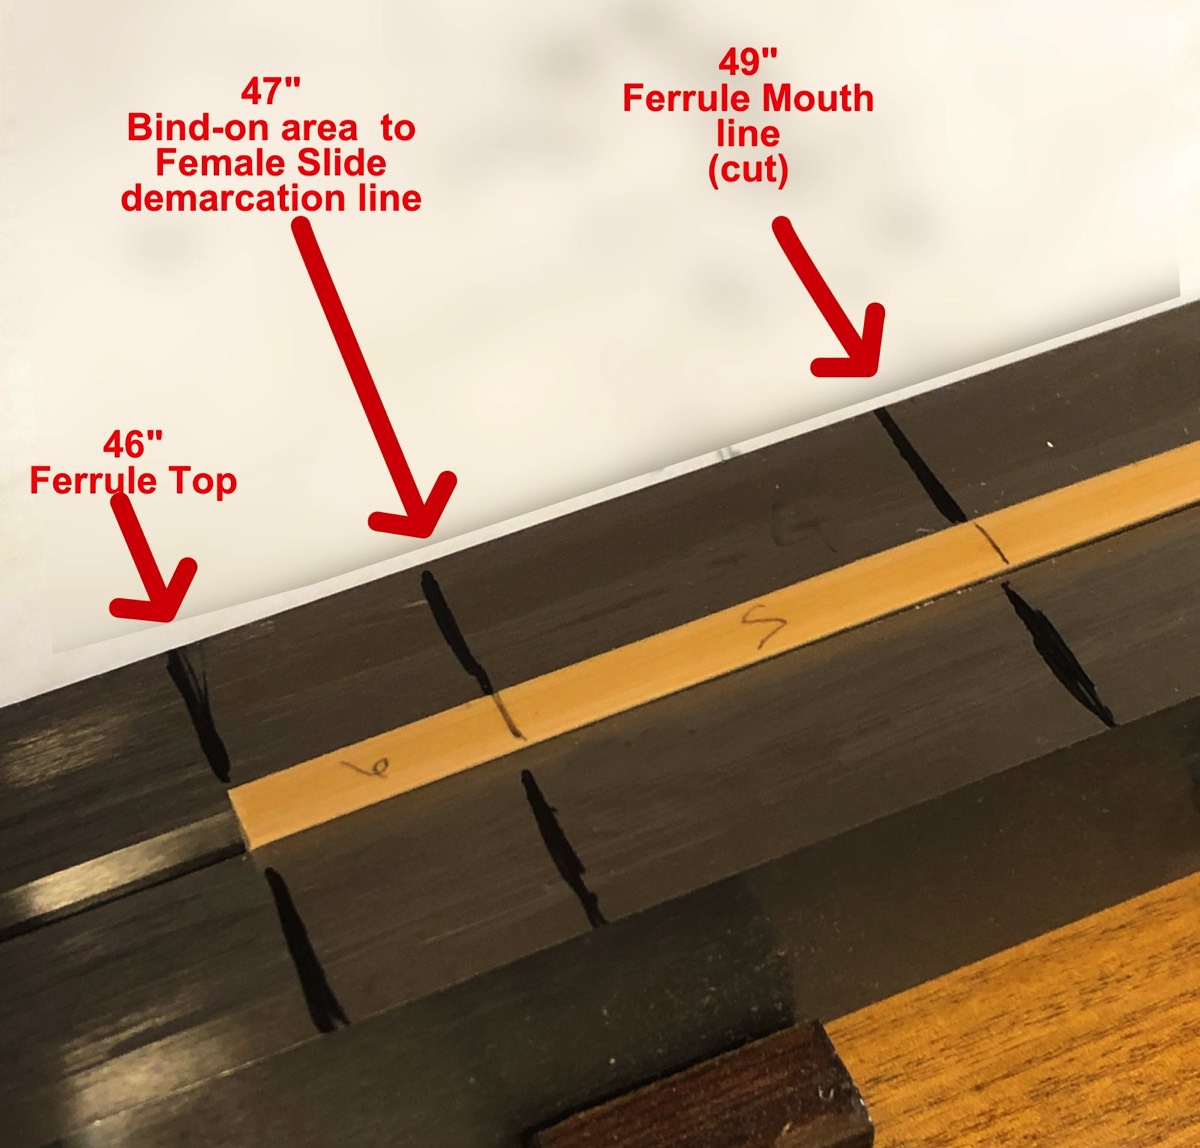
- Lay the spline, enamel up in in the groove of the form, with the top end of the spline lining up with the line across the form marking the top end (Bind-on Area) of the ferrule.
- Make a mark across the spline on the enamel side, in line with the Bind-on Area to Female Slide demarcation mark on the planing forms. You'll want to keep track of this when you trim the ferrule spline to length so that you can tell which end is which (on such a short section, it's hard to tell one end from the other with such a shallow taper). Because the Bind-on Area is shorter than the Female Slide length, this mark will always be closer to the top of the Bind-on end of the ferrule than the Slide end.
- Make a second mark on the enamel side of the ferrule spline, inline with the mark denoting the bottom of the Slide end of the ferrule (Ferrule Mouth). This is where you will carefully cut the spline to cut off the ferrule from the top of the spline when you have finished planing the spline to the ferrule dimensions.
- Plane the spline just as you would a normal rod spline, on the two inside (pith) faces, until the spline is flush with the forms.
- Carefully saw/cut the ferrule spline from the top of the planed spline at the lower mark (Ferrule Mouth line), and set it aside. It will have the pencil mark across is denoting the Bind-on to Slide demarcation.
- With the ferrule removed from the top of the spline, make sure that you have enough length of "good cane" (no nodes or imperfections) at the top end of it to form another ferrule section. If there is a node or imperfection in the new top of the spline, cut this area off.
- Repeat the process to form a second ferrule section. This should only take a few passes of the plane at most, as this new top of the spline will only be a few thou oversize, having come from just below the previously planed up ferrule section.
and repeat the previous step.
- Continue this process until you have 6 sections to form the ferrule. If you need to use a second strip/spline that's OK
I recommend preparing enough sections for at least 2 ferrules (12 separate triangular ferrule sections) as part of this process, in case you damage one ferrule, for example at a later stage during the hollowing/fitting process. It's so quick using this "production line" method that is doesn't add much time overall once you are set up.
DIAGRAM 5
Worked Example - 8 foot 2 piece Para 15
Form Layout for Ferrule Construction
Ferrule Spline - Enamel Side up in planing forms
Showing pencil marks
Ready for flipping and planing
Part 5. Making the Ferrules - Hollowing the Ferrules
At this stage, the rod sections should be checked at the stations for correct dimension and cut to the correct lengths, as the fit for both tip (Bind-on Area) and Butt (Male Slide into Female Slide) will checked during this process.
Note that throughout this process, masking tape is used to keep the ferrule splines together. Masking tape is usually 5 thou in thickness, so this needs to be factored in when measurements are made.
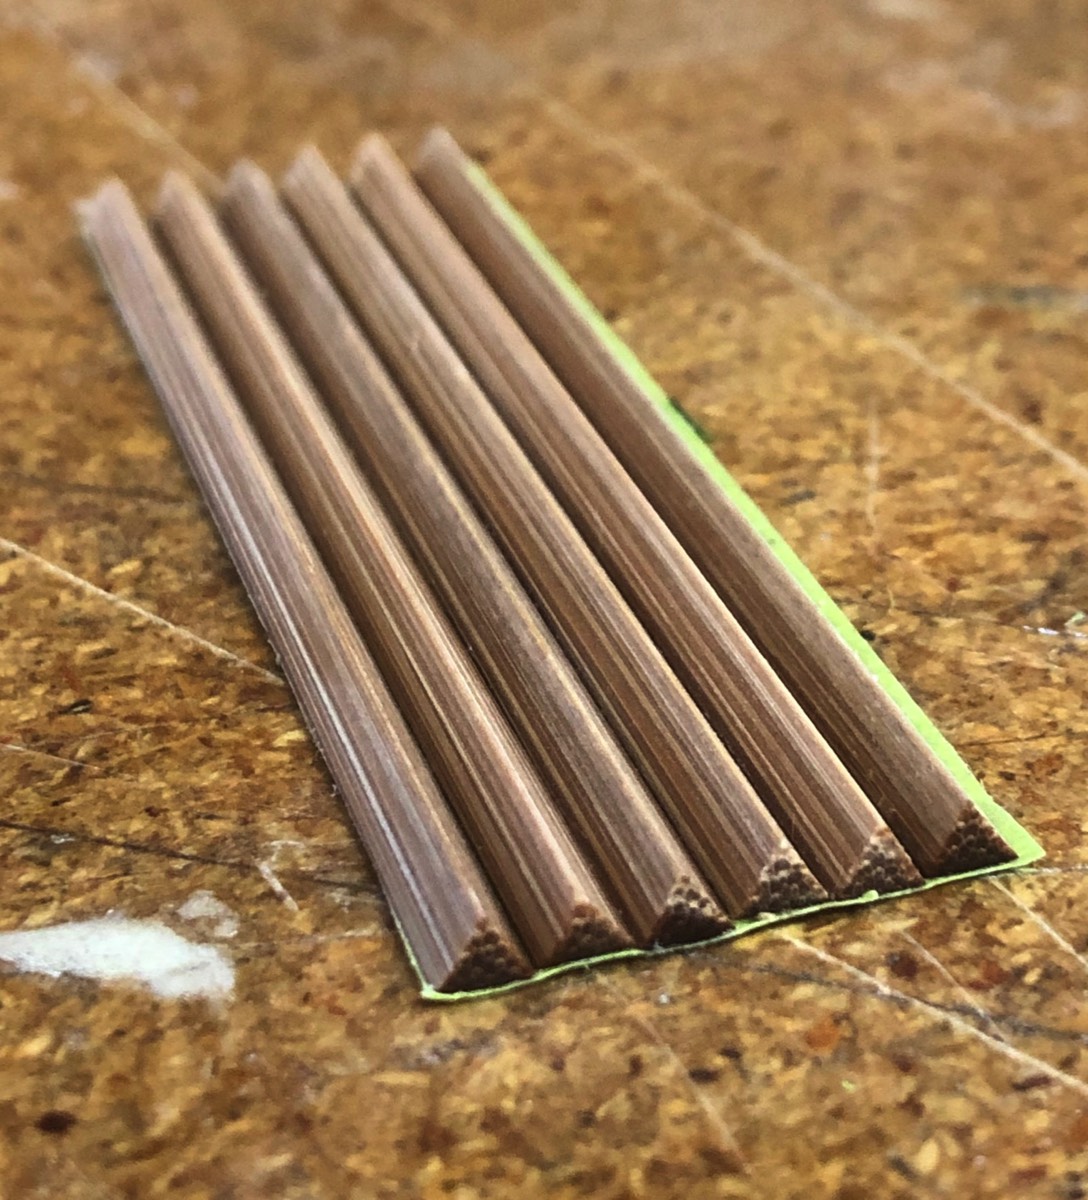
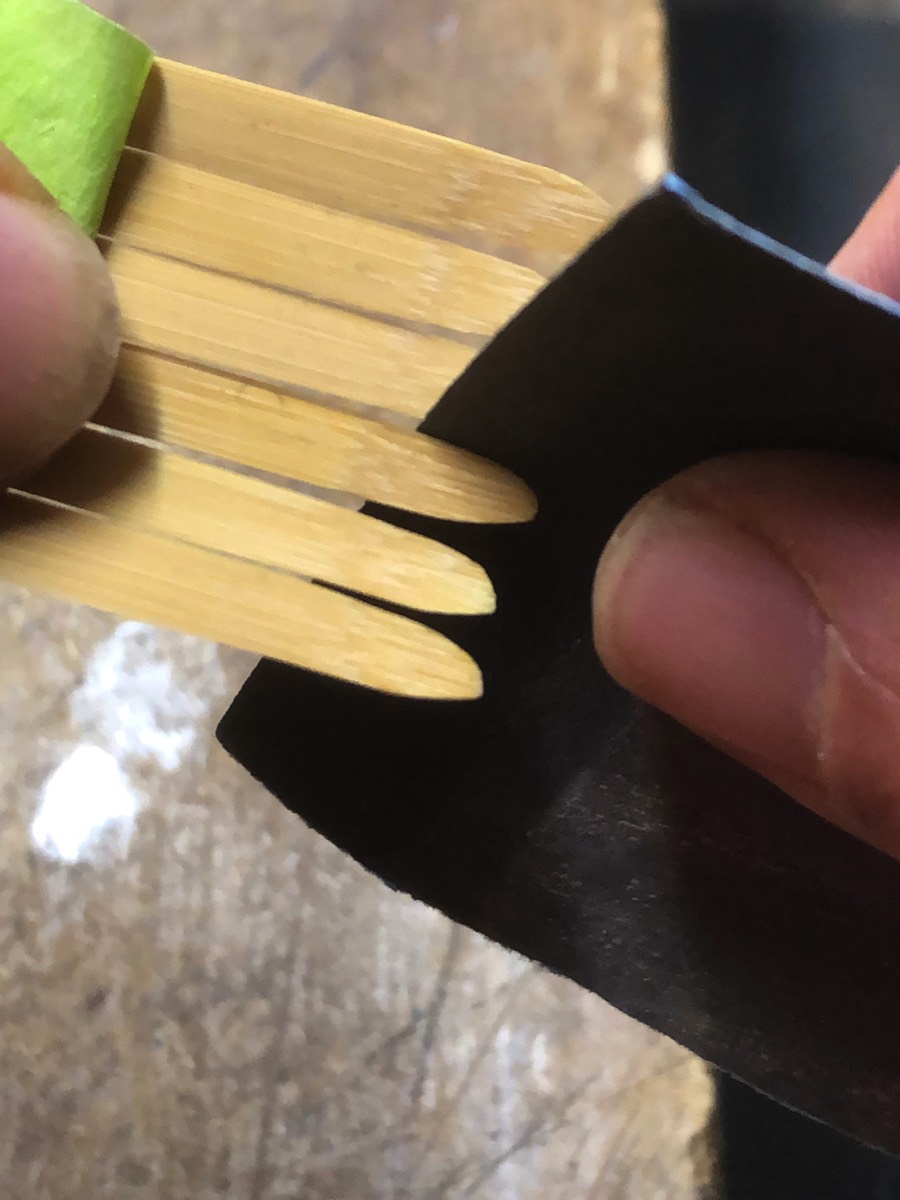
- Put 6 Ferrule splines, side by side, with the Bind-on to Slide demarcation mark aligned, enamel down, onto masking tape (sticky side up).
- Trim masking tape close to edges of the bamboo, so little or no masking tape is visible around the sides or ends of the splines.
- Make a mark across the masking tape to line up with the pencil Bind-on to Slide mark on the enamel side of the strips. This will help when you are testing the fit, as it can be difficult to tell which end is which, with the shallow taper on the short ferrule.
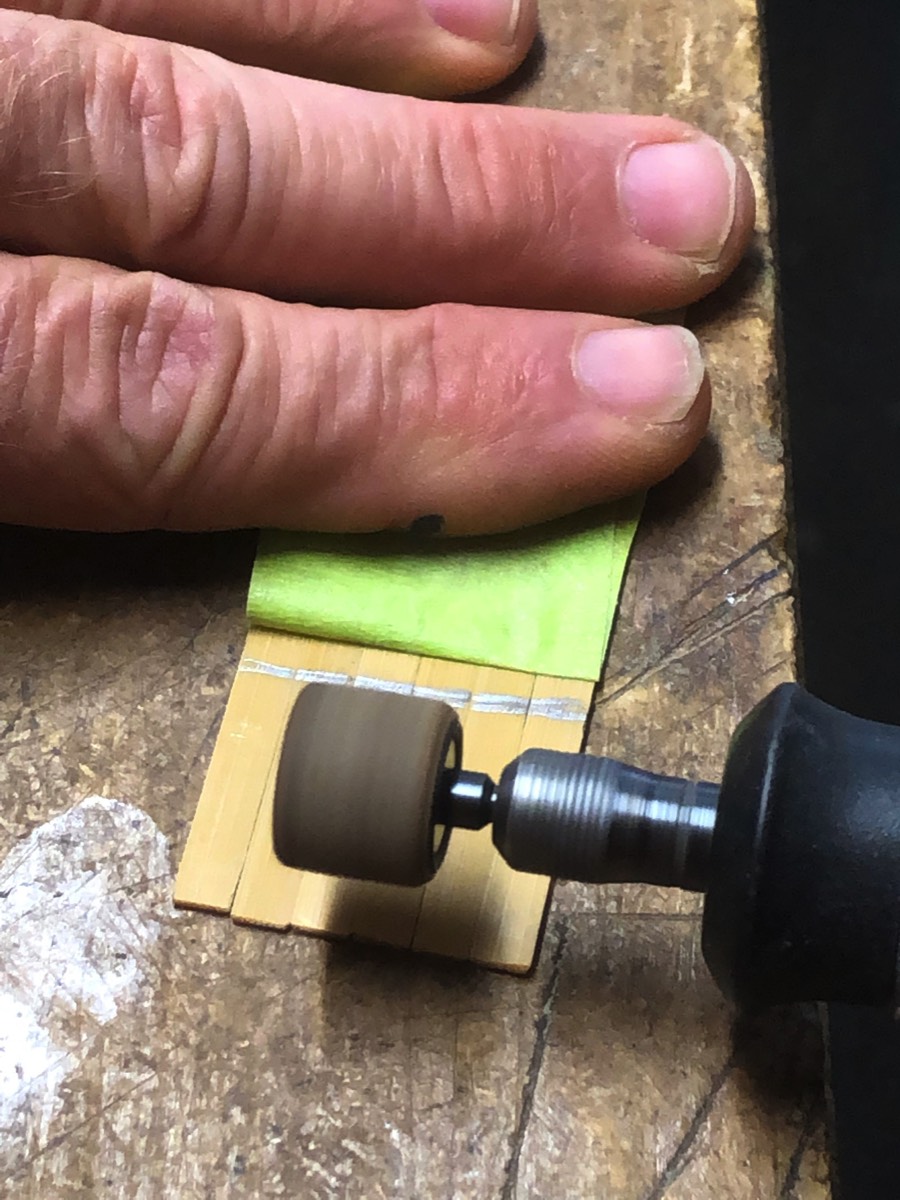
There are 2 options for hollowing (that I have tried)…
1. Guides/Shims
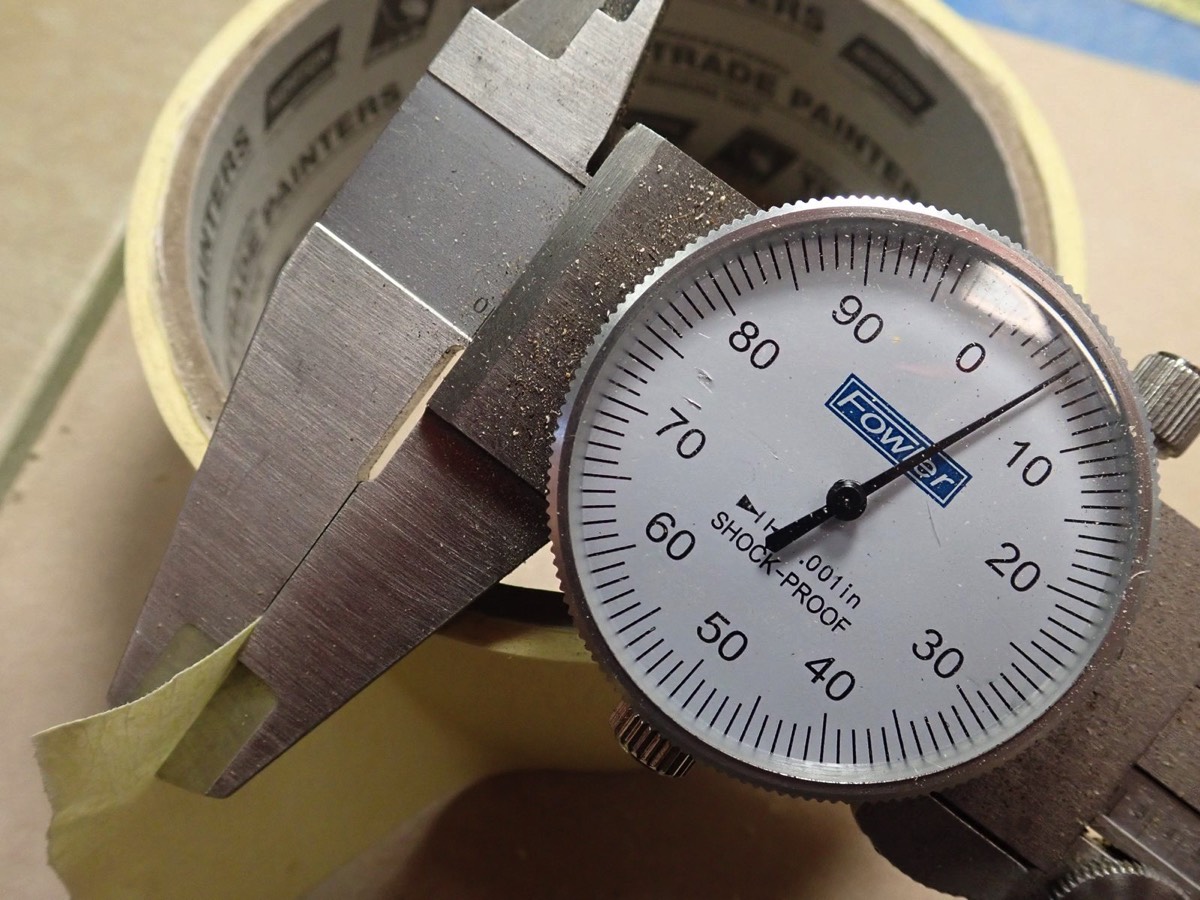
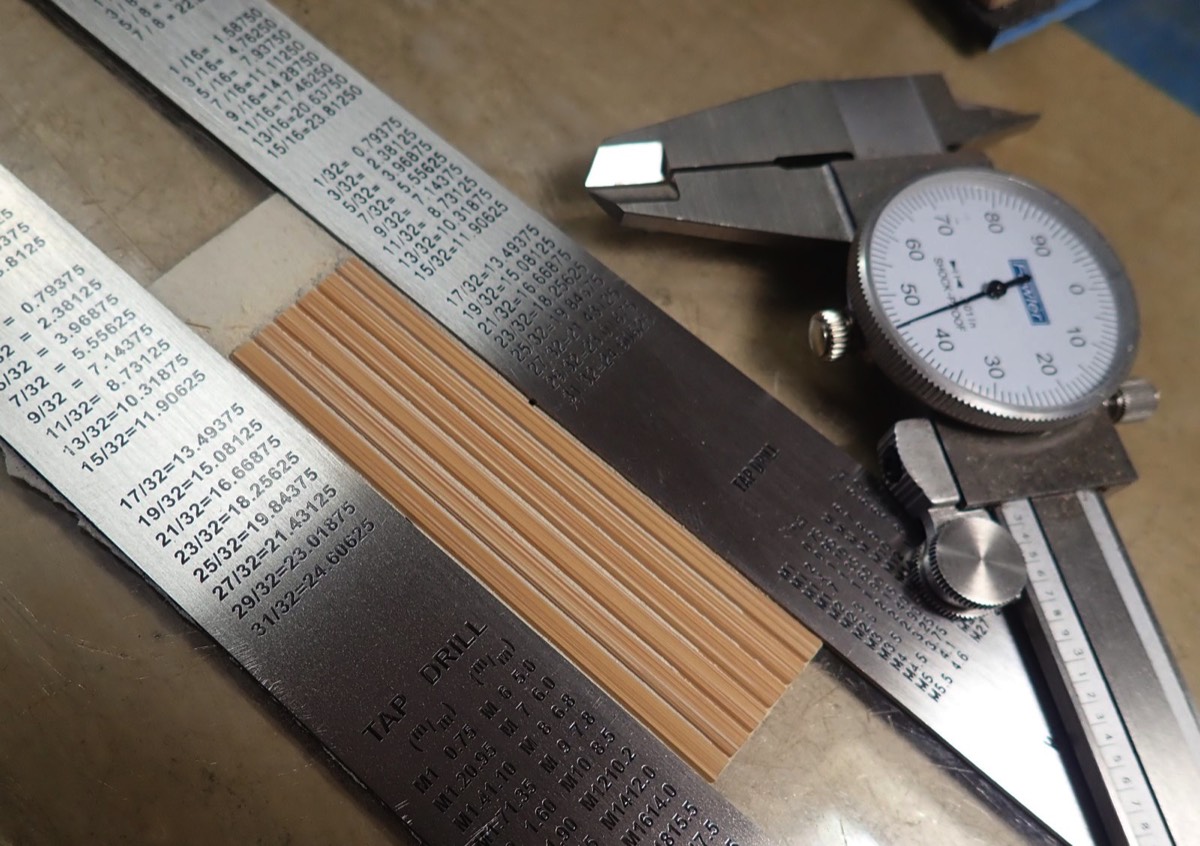
The first is to use a shims or guides, with the desired Wall Thickness, either side of the 6 ferrule splines to assist in working the inside apexes of the splines down to the desired thickness. A convenient guide has been two metal rulers with 30 thou thickness. These can be built up in 5 thou increments for additional thickness. To hold them in place next to the ferrule splines, masking tape can be used under both the rulers and the underside of the tape holding the ferrule splines together, to form a single unit. The apexes of the ferrule splines can then be sanded/planed/filed etc down until the "inside" of the flattened out ferrule is flush with the guides. You can start with course sanding/filing, but as the distance to the guides gets closer, move to 400 grit sandpaper. The guides can be removed from the tape and the ferrule splines (with any layers of tape factored into measurements) checked for size with a dial calliper.
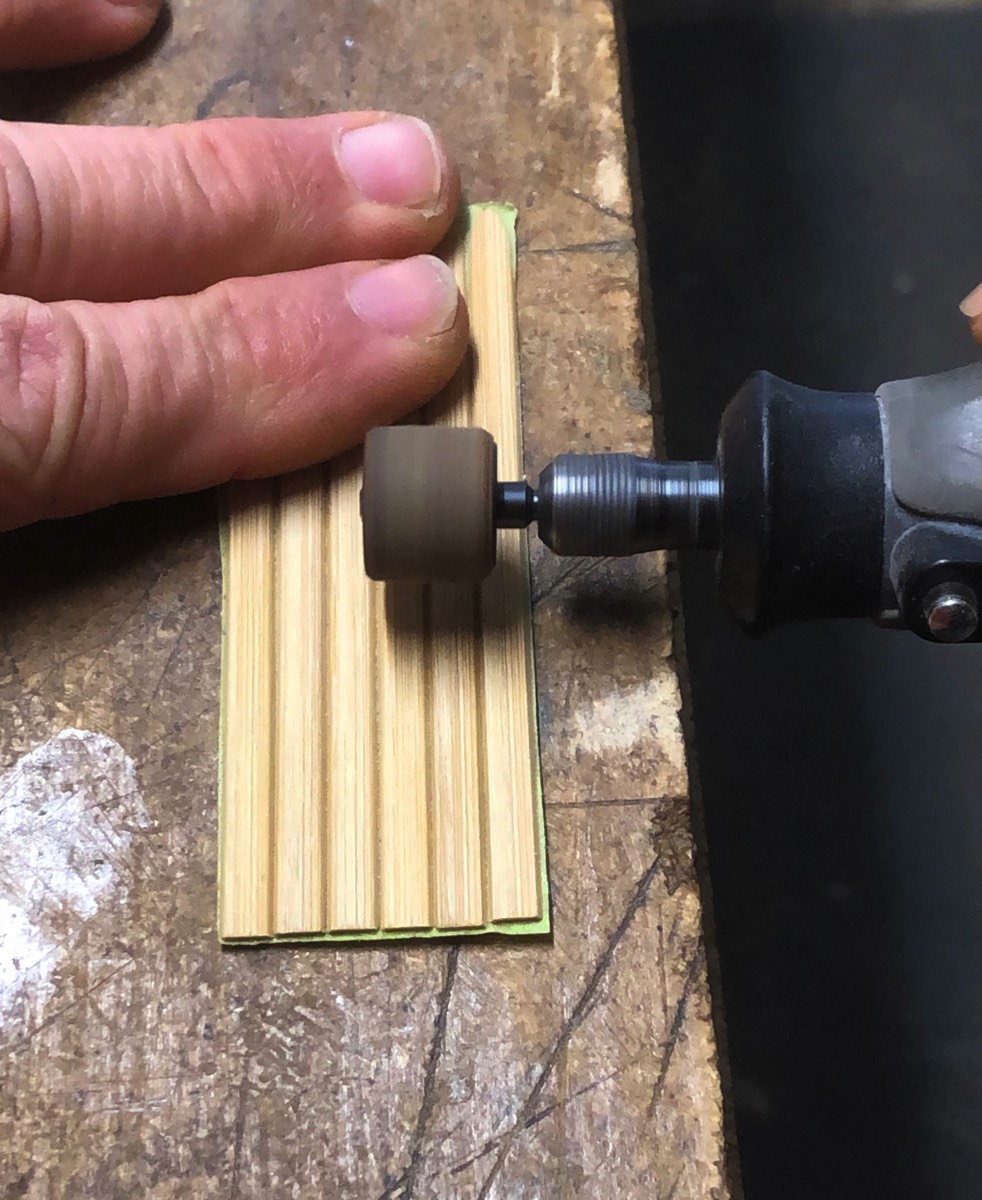
2. Free hand with Dremel sanding cylinder.
After making several ferrules using guides, I experimented by discarding them and just using a Dremel sanding cylinder, with the taped together splines held close enough to the edge of the bench to hold the Dremel next to the bench with the cylinder horizontal and parallel to the bench. Holding the "upstream" end of the splines, turning them end for end regularly, and using the powerfibres of the splines as approximate thickness indicators, they could be thinned down very quickly and with surprising accuracy. After a little practise and checking the thickness regularly gave a thickness accuracy within a few thou within a few minutes. I've managed to achieve a better fit, more quickly this way than when using guides.
After either of these methods, the procedure is the same…
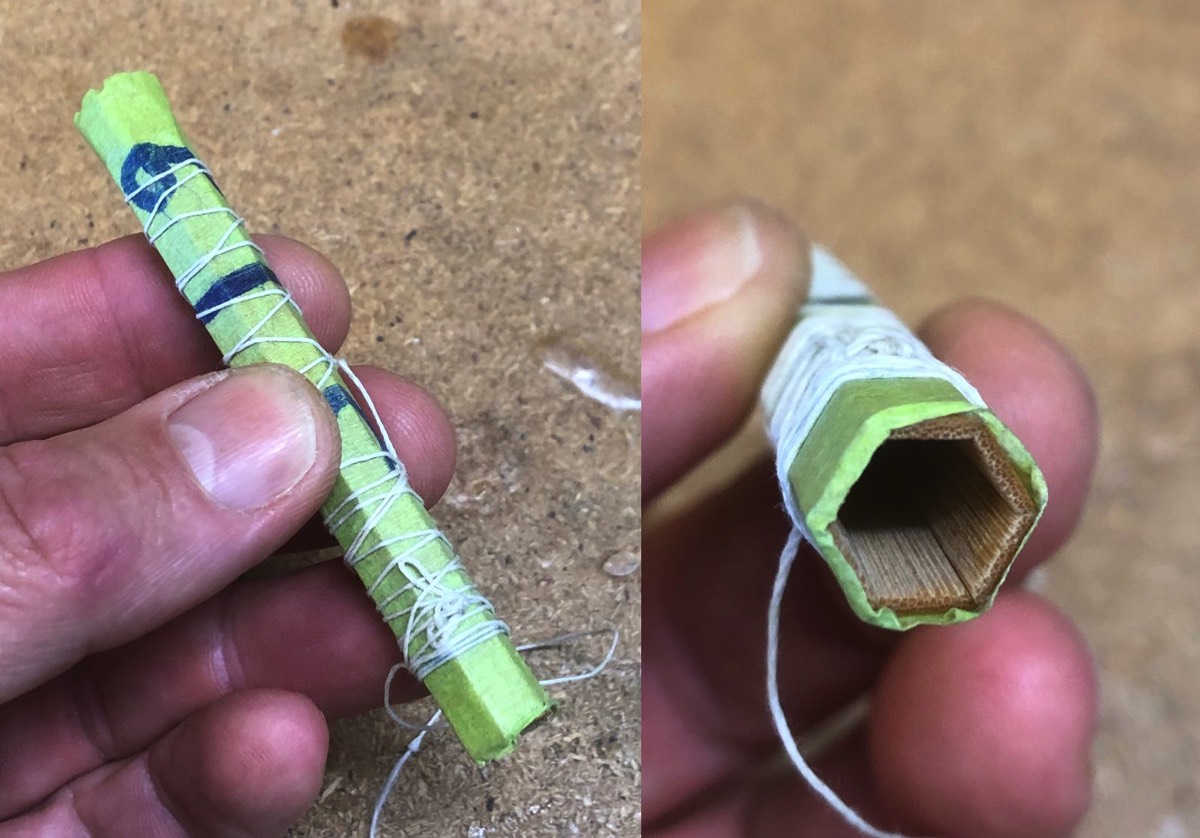
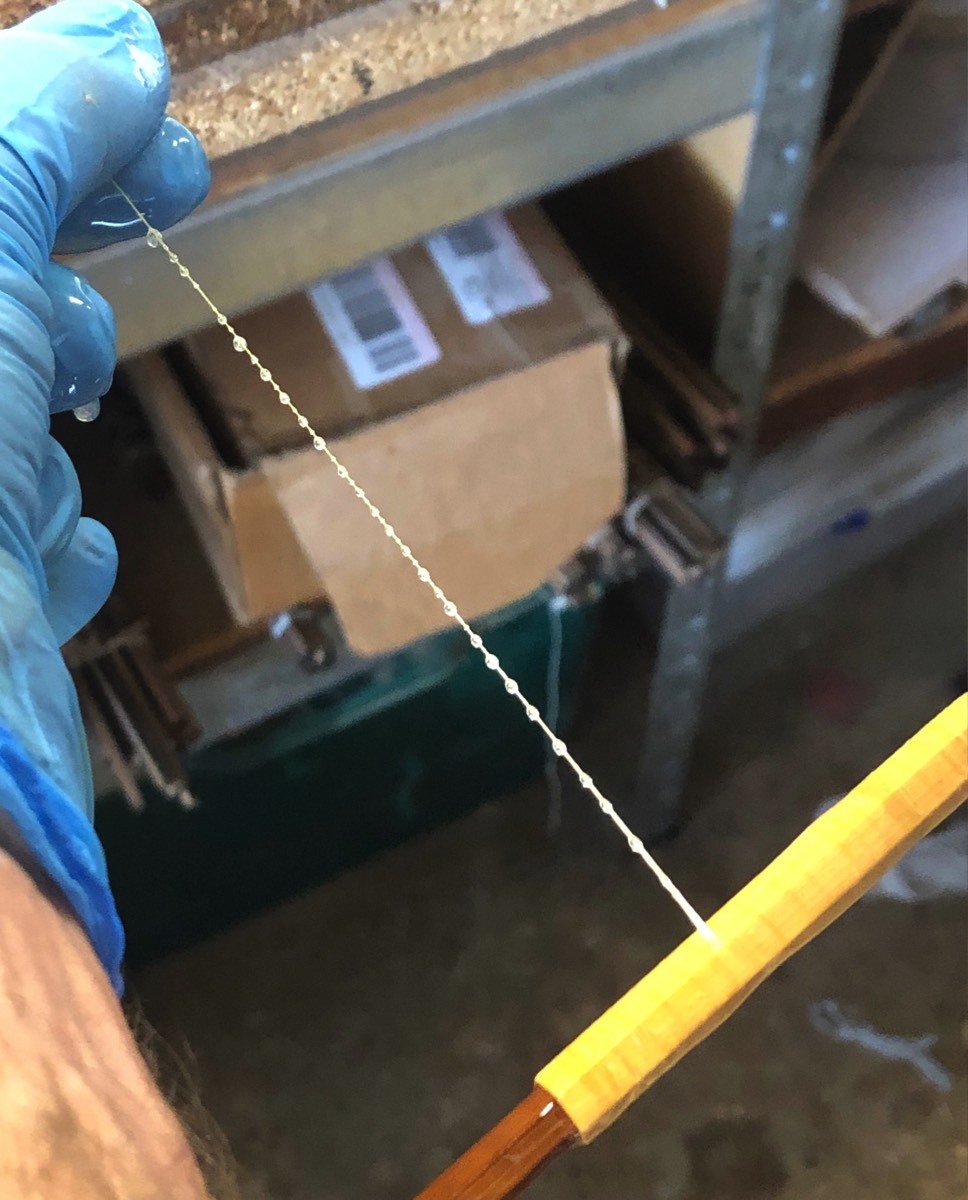
Test Fit
When a thickness is within 1-2 thou of the planned Wall Thickness, remove all but the single layer of tape holding the splines together (if you use the Free Hand method, they will already by like this). Brush/blow accumulated bamboo dust from the inside of the ferrule. The ferrule can be "rolled up" into a completed hollowed Hex, and dry bound together with cotton (no glue) for a test fit. Test the fit on both the tip (Bind-on Area) and side (Male Slide). To test the Bind on fit for the tip, mark a line on with a pencil on the blank tip where the top of the ferrule will transition onto the blank. Slide the ferrule down over the tip end of the blank, and it should come to rest in the right place on the tip section - coming up firm on the bind on area, and top (tab) end of the ferrule stopping at the pencil mark. The male fit (butt) can then be tested by inserting it into the female. Ideally it should insert the full slide length, and come up gently firm as it fully engages into the ferrule. In reality this won't happen first time around!!!!
Tuning
- If the fits are too tight, lightly sand (400 grit or finer) the opened out splines on their original masking tape, and retest until a fit on both tip (Bind-on) and butt (Slide) are achieved. Sanding can be done from this stage by turning the splines over, and hand sanding them on a sheet of sandpaper (240 and then 400 grit) on a hard surface.
- If the fits are too loose, all is not necessarily lost. As long as the fit is "close" - within a few thou, epoxy will fill the Bind-on Area onto the tip. If the Male Slide is a little loose (by a few thou) , the male can be build up with a little epoxy or Gorilla Glue, and then ferrule wax in fishing situations. In fact, after using these rods in a range of climatic conditions, I'm convinced that a "relaxed" fit at the start is better than a really tight fit. Glueing up the ferrule also seems to tighten the fit more than a dry test fit too. The male can always be built up a little with glue, and wax can be used in a fishing scenario to achieve a more reliable and removable connection than a super tight fit.
Masking Tape
5 thou thickness
Six Ferrule Splines Taped together
Apex side (inside)
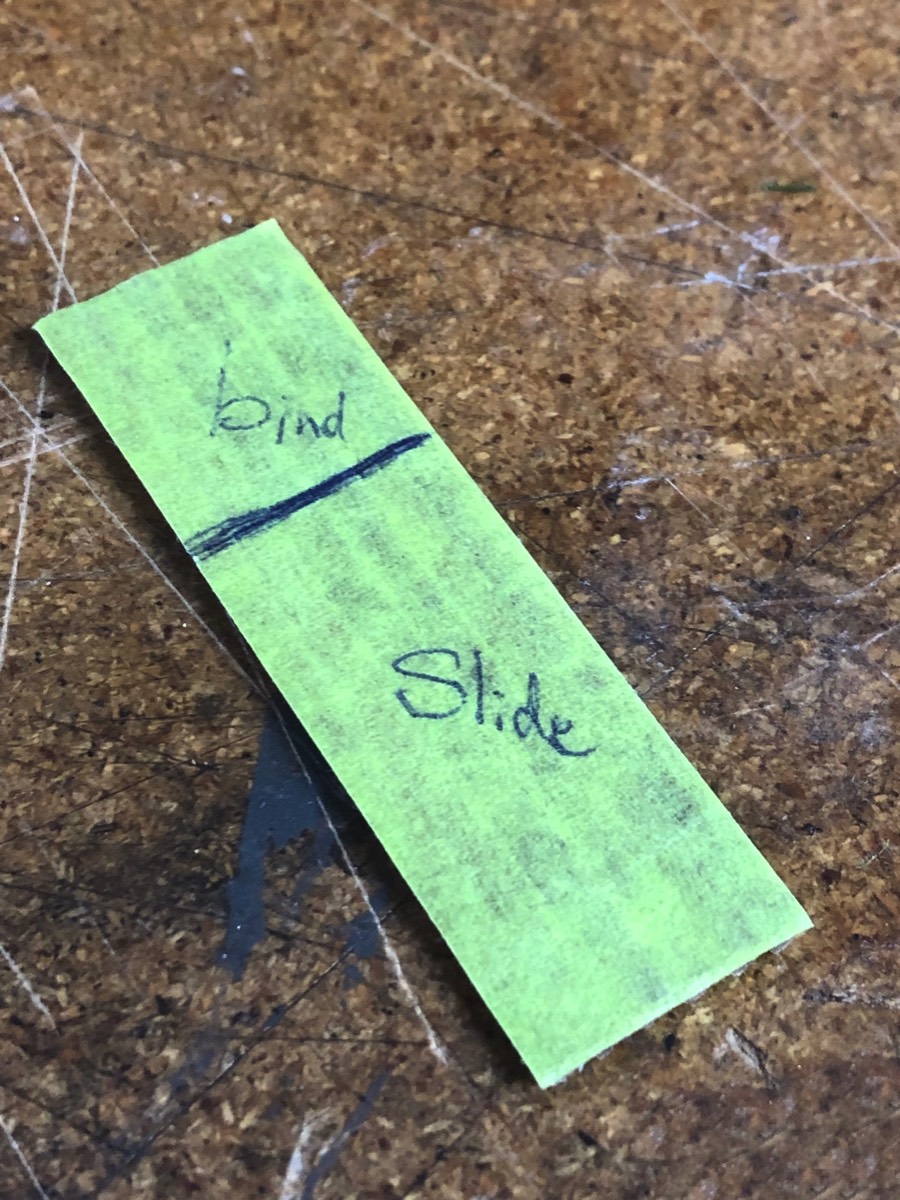
Six Ferrule Splines Taped together
Tape side showing Bind-on to Slide Mark
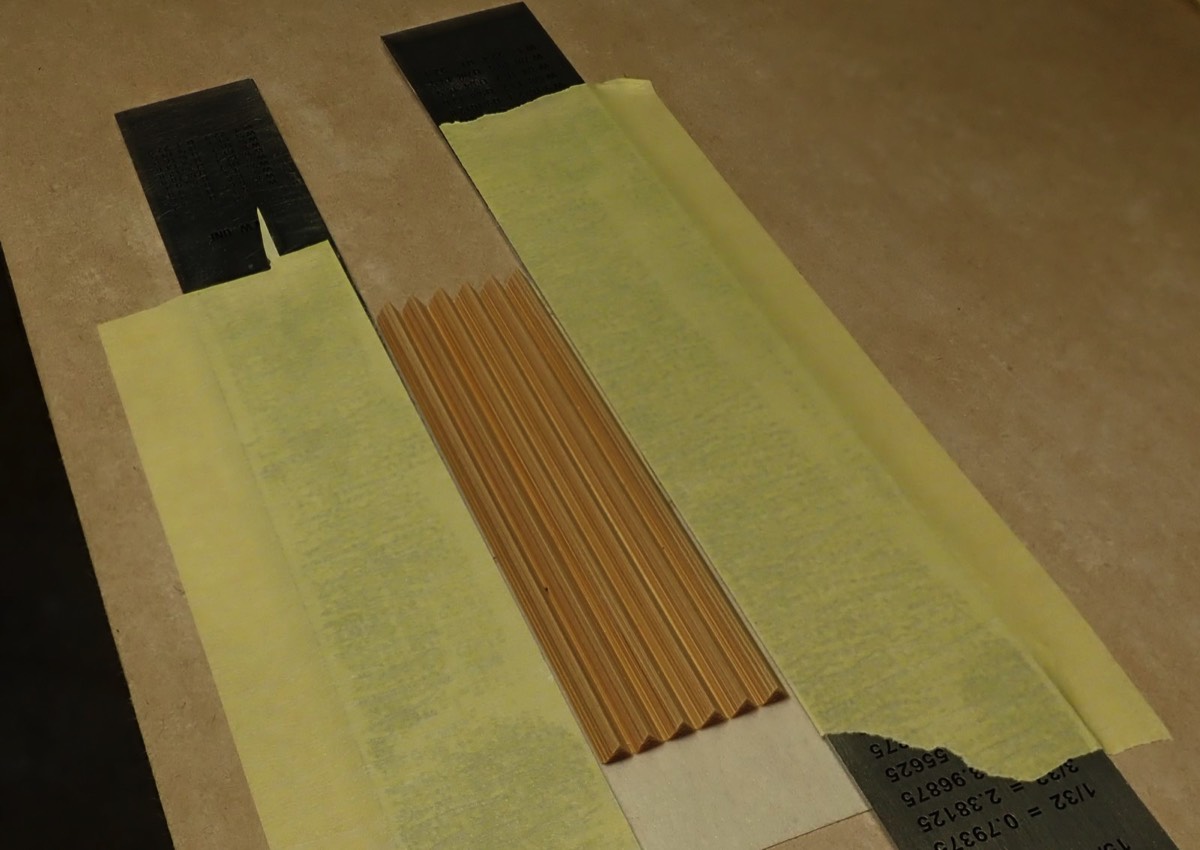
Six Ferrule Splines Taped together with rulers for hollowing guides
Before hollowing. Extra Layer of tape on the rulers for extra 5 thou Wall Thickness in this example
Six Ferrule Splines Taped together with rulers for hollowing guides
After initial hollowing
Freehand hollowing of splines
Dremel sanding disc
Taped Hollowed Ferrule
Dry bound ready for test fit
Part 6. Making the Ferrules - Prepping the ferrules
Keying the Bind on Area
The Bind-on Area of the inside of the ferrule, and corresponding area on the tip section of the blank should be keyed with sandpaper to provide the best results when they are glued together. To do this:
- Unroll the hex ferrule so that it is flat, with the 6 splines still taped side by side
- Transfer the Bind-on to Slide mark from the masking tape side of the ferrule to the inside
- Lightly key the Bind-on Area of the inside of the ferrule with 180 grit sandpaper. Take care to NOT scratch beyond the mark onto the slide are. You want this to stay smooth!
- Make a mark around the base of the base of the blank tip which marks the limit of the Bind-on Area
- Lightly key all 6 flats of the blank over this area, also with 180 grit sandpaper
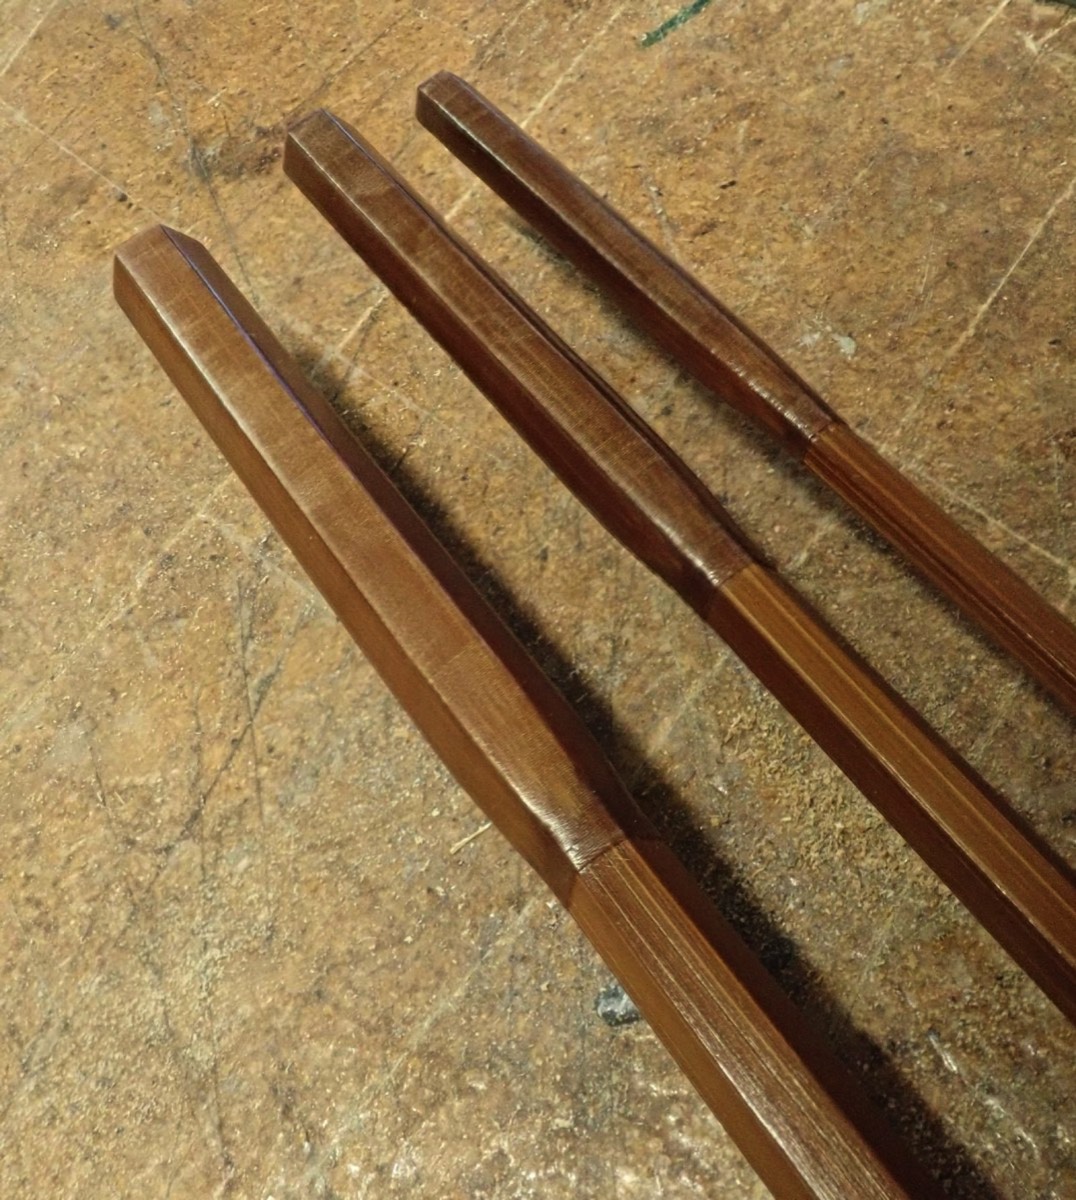
Ferrule Tabs
As for a Nickel Silver ferrule, we want a smooth transition from the ferrule to the blank. This is done by "feathering" the outside (enamel side) of the ferrule splines for a short amount of the Bind-on Area to form a sloped Tab Area. This does does 3 things:
1. Spreads the stress of the transition from blank to ferrule
2. Provides a sloped path for the Kevlar thread which will be used to bind the ferrule on with to wrap from the blank up onto the ferrule (and back down)
3. Creates as smooth aesthetic look to the ferrule on the rod
To form the ferrule tabs:
- Turn the flat ferrule, inside down onto a flat surface, with the masking tape on top
- Peel back the masking tape slightly at the "Bind-on" end, exposing the enamel side of all 6 ferrule splines
- Carefully file/sand/work the enamel side of the ends of the splines down in a feathered tapered transition. The amount to feather will depend on the size of the ferrule and length of the Bind-on Area, but a guide is too make the tab length approximately 1/4 to 1/3 the length of the Bind-on Area. So a 1 inch Bind-on Area would have 1/4 to 1/3 of an inch of tapered tabs. I've found the easiest way to begin to form the tapered tabs is with the same Dremel and Sanding Cylinder method as used for the Freehand Hollowing. Just "run" the cylinder, of the end of the ferrule splines a little at a time to form the tabs. Once an initial taper is created, the tabs can be feathered down delicately by dragging them with some downward pressure with your finger along some 240 grit paper on a flat surface. The very ends of the tabs should stay intact, but have little measurable thickness, and be translucent when held up to a light source, like a saxophone reed.
- Once the ferrule tabs are formed "top to bottom" (enamel side down), just as with the table on a Nickel Silver ferrule, the ends of the tabs can be slightly "crowned" to further smooth the transition and clasping onto the blank. This can be done by carefully inserting a piece of 240 to 400 grit sandpaper (depending on the ferrule size - finer paper for smaller ferrules), between the tabs, and with light angled pressure, sanding the ends of the tabs away a little.
Once this is done, to finally prep for glueing, the tape can be further peeled back at the tab end to reveal the pencil mark across the enamel side. This can be carefully rubbed off so that it isn't visible on the finished ferrule. It is no longer needed, as the tapered tabs identify which end of the ferrule is which. You DO need to still have some sort of light mark on the blank tip (or a thin band of masking tape) however, to know where the bind on area ends, so that when you glue the ferrule onto the blank, you know where to locate it!
When the pencil mark it removed from the enamel side of the ferrule, you can peel back nearly all the tape. Just leave enough to keep the splines side by side. Then clean any dust etc away, and lightly swab any sticky tape residue from the enamel side of the ferrule splines with turps, and clean gently with methylated spirits. Then hold the strips in place with a fine strip of new tape, across all 6 splines, with some overlap of tape over one side of the strips to form a pull tag, which you can use to remove it during the (fiddly) glue up process. A second fine strip of tape with a pull tag can also be added close to the ferrule mouth to help to keep the splines organised for the start of clglqe up. Then you can fully remove the last of the original masking tape and clean any residue from that area, leaving only the new strip of tape.
The ferrule is now ready to be glued onto the tip of the rod.
Ferrule Tabs with Dremel tool
Initial taper of tabs about to be formed on enamel side
Ferrule Tabs initial taper
Outer top-down (enamel side) taper after Dremel tapering
Ferrule Tabs Fully Feathered
Translucent ends when held up to light
Ferrule Tabs Being Crowned
Sandpaper between tabs
Tabs don't have to be crowned to this extreme - see additional picture below
Crowned Ferrule Tabs
Amount of "crowning" is optional
This amount is enough for good coverage of the Bind-on Area and a smooth transition.
Ferrules and Blanks Keyed for Glueing
Bind-on Area of Ferrule and Blanks Keyed - noted sanded/roughed areas
In this example a removable strip of tape is on the blanks in lieu of a pencil mark to mark the end of the Bind-on Area
Ferrule ready for Glueing
Inside view
2 strips of tape with pull-off tabs
Tabs slightly crowned
Light reflecting off slide area shows finely sanded surface
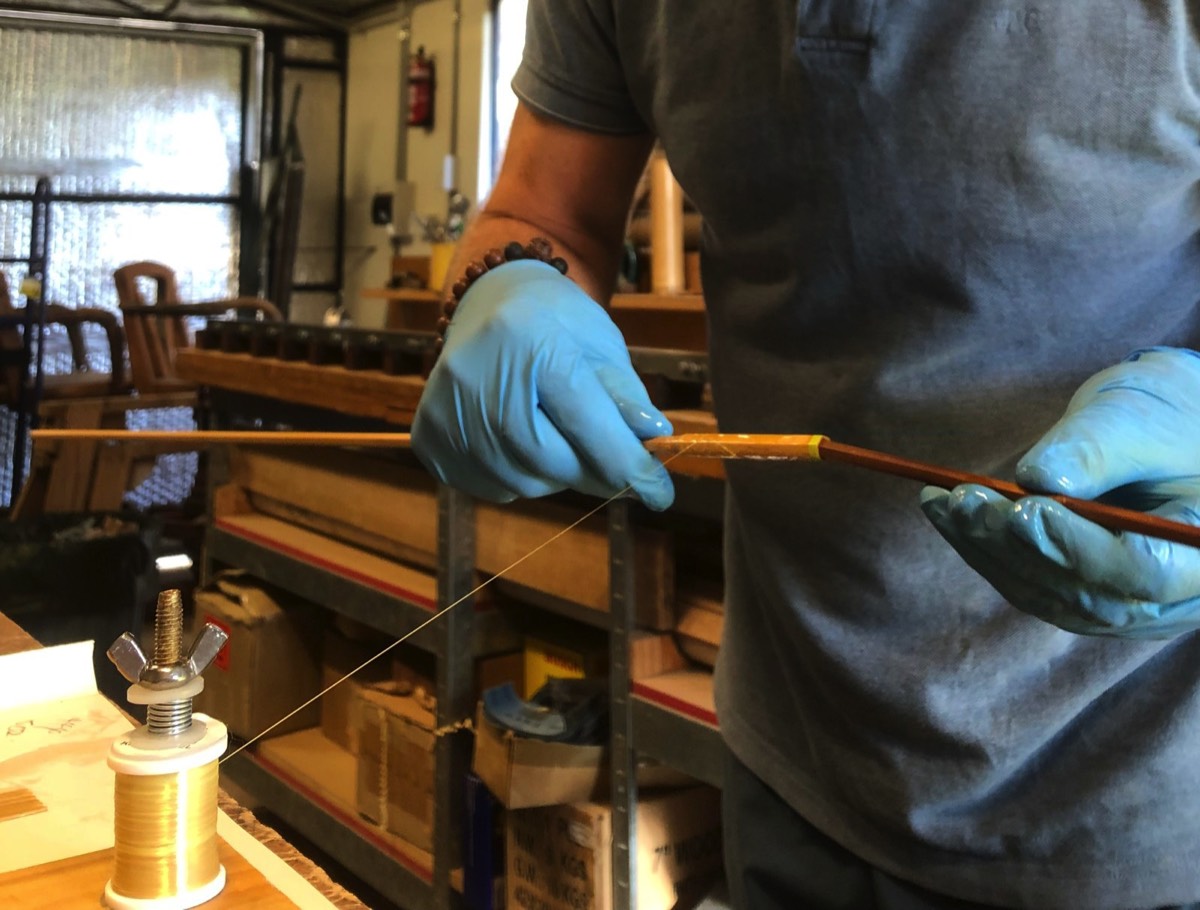
Part 7. Glueing the Ferrule to the blank
Like any task involving glue, this can be a messy and fiddly business. Preparation is the key! I will describe two alternative methods for glueing the ferrules, which end up with similar results. The first is the method which I currently use, but is a little more fiddly to get right. After several ferrules however, I've come to prefer this as I feel that it results in a more integrated result. This method involves using fly tying Kevlar floss to bind the ferule to the rod during glue up. This Kevlar and the glue is left on the ferrule, meaning that the job is effectively completed at this stage. The second method involves glueing and binding the ferrule onto the rod with cotton string (the same used for binding a rod blank). After the glue is set, the string is removed, and the glue is CAREFULLY sanded from the ferrule. The ferrule is then rebound with silk (or Kevlar) and finished with varnish. When starting out, it's easier to produce a nice looking result with this method, but care must be taken not to split or damage the ferrule when sanding off the glue.
Kevlar "Leave On" Method
Kevlar floss is very strong, so it helps to reinforce the overall strength of the ferrule. Wrapped in an up and back spiral pattern over the ferrule several times, a type of "mesh" look can be achieved. Being a floss, it spreads and lays flat when wrapped, so it maintains a low profile and adds little to the size of the ferrule. But being a floss, it needs to be managed properly during the wrapping to stop it from bunching up.
As mentioned before, preparation is essential during glue up. I use L139 Epoxy (the same as for glueing up rod blanks) for the glue up. When glue is on your gloves, it's important to have everything that you need t your fingertips…
- Lay out some paper on the bench and tape it down, to make a clean easy to clean up working surface.
- Prepare some Kevlar "pull throughs" for finishing the wraps (the wrap is finished in a similar way to wrapping guides, wrapping over a "pull through" several times, passing the wrapping thread through the loop of the pull-through, pulling it through, and trimming). Because the floss with glue on it is very slippery, the pull through should be made in a closed loop, using a surgeons knot to close the loop. This will let you hook your finger inside the loop, at the knot, when pulling through, without it slipping. The Kevlar is very light, so it may be worth taping the tips of the pull-throughs, beyond the knot, to the bench so that you don't lose them. And make up a few spares in case you need them!
- Find a hex rod offcut to use as a temporary male ferrule "handle" while wrapping the ferrule. You will need this to wrap the ferrule without holding onto the ferrule itself and matting/messing up the Kevlar. After the first few turns of Kevlar have secured the ferrule onto the blank, you will be able to hold the blank on one side when wrapping. But you need something to hold on the other side. So a blank offcut inserted into the female ferrule as a temporary male "handle" will do this. It is ESSENTIAL that this offcut should be a VERY LOOSE fit into the ferrule. Otherwise, you won't be able to remove it when you have finished binding!!!
- Have a craft razor blade (and a spare or two) ready for cutting the kevlar wrap
- Have a dish of Methylated Spirits ready for cleanup along the way and lubricating your gloves for extra working time when the glue gets tacky
- Have some cotton buds ready for cleaning excess glue from the inside of the ferrule after wrapping and glueing.
- Have some small rags or blue paper cloth/towel for cleanup etc along the way. It's better to have lots of small pieces rather an a few large ones, as you can start with a small clean one with no glue on it rather than a cloth already contaminated with glue
- Clamp your thread tensioner with the Kevlar spool on it to the bench. clamp it in a place where you can run half to an arms length of thread from the front of the bench and have it hang freely, as you need to constantly "dress" and stroke the dry Kevlar floss with glue while wrapping
Measure and mix the glue. You will need to constantly access the glue with your gloved finger to apply it to the Kevlar during the wrapping, so you should cut the top of the mixing cup down, or transfer some mixed glue to a shallow dish.
Apply some glue to the Bind-on Area of the blank, and all of the inside glue seams of the ferrule, and over the inside of the Bind-on Area of the ferrule.
Apply a little glue with your fingers to a couple of the Kevlar pull-throughs, to "train" the floss threads together, while keeping the loop open.
Pull a half arms length of Kevlar off the spool. The tension should be about the same as when wrapping guides - or a little tighter. With some glue on your gloved fingers, gently draw the Kevlar, from near the spool, towards you, off the end of the thread. This is to "dress" or impregnate the Kevlar. Drawing the thread from the spool to the ends will pull the floss fibres into line, and elongate them as much as possible. This is the only time you will dress the thread in this direction! Once you are wrapping the ferrule on, you will constantly dress a half arm air so working length of thread with glue, but will always dress from the ferrule, away, back towards the spool. This will keep the thread which is being wrapped onto the rod as straight as possible, and stop it from bunching up.
Take the ferrule, and wrap it around into shape, in place over the rod blank, so that the tips of the tab line up with your pencil mark to line of tape on the blank.
Take the Kevlar thread, and start wrapping it around the ferrule, over the middle of the Bind-on Area of the ferrule, overlapping the thread as you would to start a guide wrap. The overlap doesn't have to be as neat or exact as with a guide wrap though. After a half dozen or so overlaps, the ferrule should be securely in place on the blank. If need be, trim the loose end of the Kevlar with a razor blade. You'll see how strong it is, and it can be a tricky task, with only two hands! If it is short enough, you can just wrap over it. Continue to wrap more turns, close together down over the tabs and onto the blank by 1/8 to 1/4 of an inch or so (the Kevlar Wrap Lead-in"). If you used a band of tape to mark where the ferrule tabs were going to line up with, remove his before binding down onto the blank. Whenever you run out of "wet" thread, dip your finger into the glue, and dress/wipe some glue onto the Kevlar, from the ferrule back towards the spool. Then wrap back up the tabs and onto the bind on area. You'll find that a certain angle of diagonal spiral works best when winding up or down the tabs to avoid slipping and bunching. If it starts to bunch (you can check it with some gentle sideways pressure with your finger to see it it moves), unwrap the loose turns and rebind. The main thing is to keep the angle of spiral even/parallel rather than change the angle. Keep wrapping in a spiral, up over the Bind-on Area onto the Slide area of the ferrule. Remove the masking tape bands from the ferrule as you approach them with the wraps. Now you can insert the blank offcut into the female ferrule to use as a handle while wrapping. Spiral wrap to around 1/8" of the Ferrule Mouth. Keep dressing the thread with glue as you go. At the mouth of the ferrule, wrap 5-6 extra, parallel wraps for extra reinforcement. Then spiral wrap all the way back down onto the blank as before, and back up to the ferrule mouth. Again, make 5-6 parallel wraps at the Ferrule Mouth. And keep dressing the thread with glue. Spiral back down over the Slide Area, and onto the Bind-on Area. Then take one of the pull-through loops, and place it along the blank, in a similar way to when wrapping guides. Make 5-6 close turns of thread over the pull through. Finish as you would a guide wrap - lock the thread with your thumb, cut the wrapping thread, put the loose end through the pull-through loop, pull the thread under the overlaps with the pull through, and trim the pulled through tag.
Now you can clean off the excess glue. You may want to re glove with fresh gloves at this point… Clean up the excess glue from the blank with Methylated Spirits. Try not to touch or disturb the wraps by unduly touching them. When the blank is clean, remove the blank offcut male handle from inside the female. Carefully swab out any excess glue from inside the Slide area of the female with cotton buds and Methylated Spirits. This may take quite a bit of swabbing. Pay attention to the inside corners of the Slide are as well as the flats.
It might be tempting to try a test fit with the actual male ferrule (butt section) at this stage, but I would warn against it! If the fit is very tight (which you can address later), you might get the male stuck in there, and not be able to get it out! You can clean your blank offcut male "handle" that you used while glueing up, and gently insert that a couple of times to check that it comes out without excess glue, and then re swab with Metho on a cotton bud.
Set the ferrule aside to let the glue semi set. I set the ferruled blank tip down, so that any small amount of excess glue will hopefully migrate away from the Ferrule Mouth to the Blank-tip base, but realistically you should have swabbed out all of the glue. If you are doing multiple ferrules in one session, it pays to mix a fresh batch of glue for each ferrule, to maximise working time.
When the Epoxy is partially set (male an hour, depending on the temperature), you can gently smooth the epoxied kevlar wrap. The epoxy should be beyond the liquid stage when you do this - sort of a semi hard gel. With a clean gloved finger, dipped in Metho, gently stroke along the flats of the ferrule, taking care not to over massage it around the pull-through area. You don't want to unravel it! Just a light smooth over can help to create a better finish. You can repeat this a few times as the epoxy hardens. If you find the thread is uneven and a little "dry" of glue, you can apply a little excess epoxy to smooth it out. The time to apply the extra epoxy is when it is like heavy honey, so that you can steer it into place with a gloved finger and Metho rather than when it is too runny.
When you have a smoothly coated ferrule and the epoxy is set hard enough not to drip or run, set is aside to fully cure.
When the glue is fully cured, any high spots of Kevlar can be carefully cut off with a razor blade. Typically these will be the original thread end from starting the wrap, and the final pull-though end. The ferrule may be OK as is, but a cleaner finish can be achieved by a light "sand" with 3M polishing cloth (green course grade), and then a top coat with Gorilla Glue. You just want to smooth the surface when sanding, not tear at the Kevlar, so it depends how much epoxy you had over the ferrule at the end of glue up.
Note that the Kevlar is a good colour match for blonde cane (such as un heat treated Madake). For flamed cane, A layer of 815 YLI Tan silk can be wrapped over the Kevlar, and varnished to achieve a better colour match. If this is planned, a little more sanding of the flats is acceptable to get a flat base for the silk wraps, even if it frays the Kevlar in a few places.
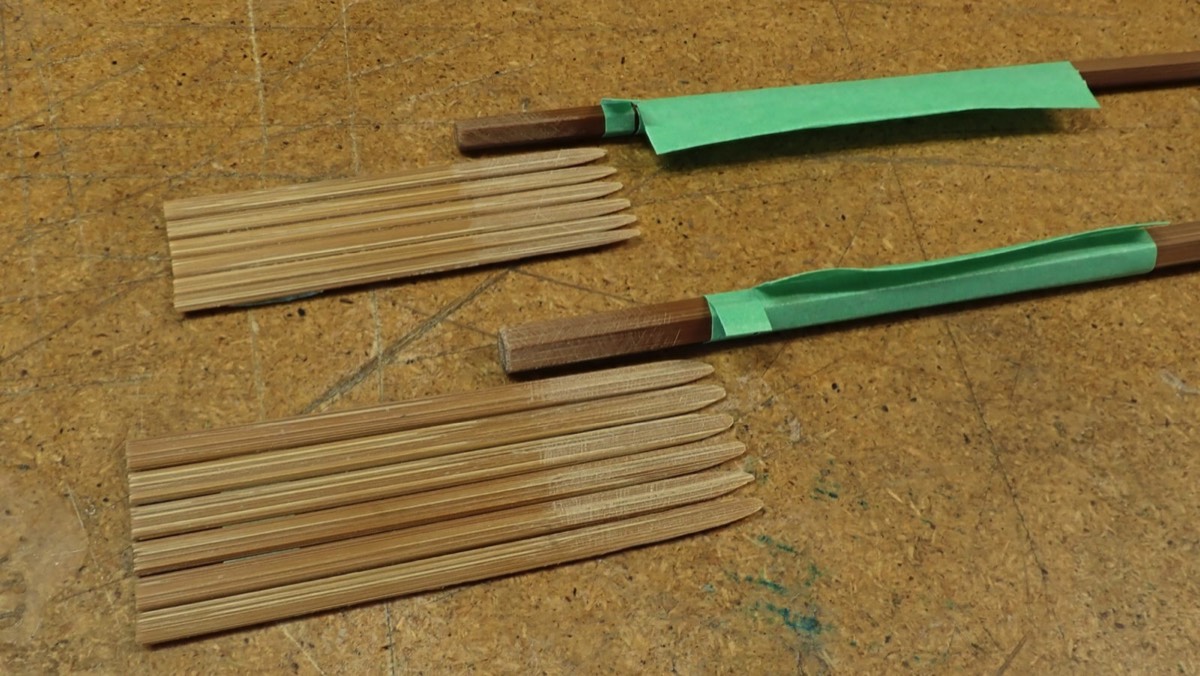
Preparation for glue up
Kevlar thread clamped in place
Ferrules and blanks ready for glue application
Razor blades for cutting
Blank offcuts for temporary male "handle" (flamed at top)
Cotton buds for cleanup
Kevlar pull-throughs taped down
Preparation for glue up
Close up of Kevlar pull-throughs taped down for easy access
Glue up
Starting the Kevlar wrap on the Bind-on Area
Glue up
Inserting the blank offcut temporary male "handle"
Glue up
Dressing glue onto the Kevlar
Wiping away from ferrule towards spool
Note droplets of glue
Glue up
Kevlar wrapped ferrules after initial epoxy curing (pre refinishing with sanding and Gorilla Glue)
Glue up
Fully finished Kevlar wrapped ferrules after Sanding and Gorilla Glue finishing on completed blonde rod

Glue up
Fully finished Kevlar and 815 YLI Silk wrapped ferrules after Sanding and Gorilla Glue finishing on completed flamed rod
The general preparation and procedure for this method is similar to the Kevlar method. Less care us needed during glue up, but some additional steps are required after glue up.
- Lay out some paper on the bench and tape it down, to make a clean easy to clean up working surface.
- Find a hex rod offcut to use as a temporary male ferrule "handle" while wrapping the ferrule. This is optional as you don't necessarily beed it to cotton bind the ferrule, but it may make it easier to glue and bind the ferrule. It is ESSENTIAL that this offcut should be a VERY LOOSE fit into the ferrule. Otherwise, you won't be able to remove it when you have finished binding!!!
- Have Methylated Spirits ready for cleanup along the way and lubricating your gloves for extra working time when the glue gets tacky
- Have some cotton buds ready for cleaning excess glue from the inside of the ferrule after wrapping and glueing.
- Have some small rags or blue paper cloth/towel for cleanup etc along the way. It's better to have lots of small pieces rather an a few large ones, as you can start with a small clean one with no glue on it rather than a cloth already contaminated with glue
- Clamp your thread tensioner binding thread on the on the bench.
Measure and mix the glue.
Apply some glue to the Bind-on Area of the blank, and all of the inside glue seams of the ferrule, and over the inside of the Bind-on Area of the ferrule.
Take the ferrule, and wrap it around into shape, in place over the rod blank, so that the tips of the tab line up with your pencil mark to line of tape on the blank.
Take the cotton thread, and start wrapping it around the ferrule, over the middle of the Bind-on Area of the ferrule, overlapping the thread as you would to start a guide wrap. The overlap doesn't have to be as neat or exact as with a guide wrap though. After a half dozen or so overlaps, the ferrule should be securely in place on the blank. Continue to wrap more turns, close together down over to the end of the tabs (there is no need to bins beyond this onto the bank. Then wrap back up the tabs and onto the bind on area. Keep wrapping in a spiral, up over the Bind-on Area onto the Slide area of the ferrule. Remove the masking tape bands from the ferrule as you approach them with the wraps. Now you can insert the blank offcut into the female ferrule to use as a handle while wrapping. Spiral wrap to around 1/8" of the Ferrule Mouth. Then spiral wrap all the way back down onto the Bind-on Area. Once you've wrapped firmly up and back over the ferrule and it is is securely in place, tie off the cotton binding thread with a few half hitches.
Now you can clean off the excess glue. You may want to re glove with fresh gloves at this point… Clean up the excess glue from the blank, and outside of the wrapped ferrule with Methylated Spirits. In contrast to the Kevlar method, you want to remove as much glue from the outside of the ferrule now, as you will have to sand it off later anyway. When the blank is clean, remove the blank offcut male handle from inside the female. Carefully swab out any excess glue from inside the Slide area of the female with cotton buds and Methylated Spirits. This may take quite a bit of swabbing. Pay attention to the inside corners of the Slide are as well as the flats.
It might be tempting to try a test fit with the actual male ferrule (butt section) at this stage, but I would warn against it! If the fit is very tight (which you can address later), you might get the male stuck in there, and not be able to get it out! You can clean your blank offcut male hand that you used while glueing up, and gently insert that a couple of times to check that it comes out without excess glue, and then re swab with Metho on a cotton bud.
Set the ferrule aside to let the glue set.
When the glue is set, carefully unwrap the binding thread. GENTLY file or sand the excess glue off the flats of the ferrule, and feather sand the tabs to a smooth transition where they join the blank. Too much pressure when sanding can split the ferrule open through the Slide area. You may want to use the blank offcut used when you bound the ferrule, inserted back into the ferrule while sanding as a support, but this is a rich in itself, as you can inadvertently split the ferrule with this too! Just take care!
When the glue is removed from the ferrules, you have the opportunity of an additional step of lightly "softening" the corners/edges of the ferrule with 0000 steel wool. The thinking behind this is to soften the edges of the bamboo a little, to reduce the sharp edge which puts pressure on the silk wrapping over them. But removing the edge is also reducing the tickness of the glue line, so you don't want to "round" them off too much either.
The ferrule can now be wrapped with clear, or 815 silk from the blank, just below the tabs, up to the ferrule mouth. The blank offcut can be inserted into the female as a temporary handle while wrapping. Take care not to apply pressure to the ferrule with the blank offcut as the ferrule can be split! The ferrule wrap can then be varnished. After initial varnishing of the ferule wrap, a second, short reinforcing wrap should be made for 1/8" to 1/4" at the ferrule mouth, and then varnished as well, along with further coats of the whole ferrule.
Glue up
Sanded ferrules ready for rebinding with Silk thread
Note blank offcut temporary male "handles" inserted
Glue up
Ferrules rebound with 815 silk after initial varnish applied
Still require additional reinforcing wrap at Ferule Mouth
Part 8. Making the Ferrules - Tuning the Ferrules
Hopefully, after glue up and finishing, the male (blank butt) will fit fit perfectly as for the dry fit. But I've never found that to be the case…
Loose fit
A loose fit can be tuned by adding layers of Gorilla Glue to the Male-Slide area of the butt section.
If the fit is very loose, the inside of the Female Slide can also be built up by applying some epoxy to the male, and inserting and re inserting it into the female a few times. Excess epoxy can be wiped off the male and the epoxy dressing allowed to cure.
Tight fit
If the fit is too tight, the male can be sanded down a little until a good fit is achieved. it can also help to "soften" the edges of the male slide with a light polish with 0000 steel wool.
The female can also be internally expanded a little by cutting narrow strips of 3M Polishing paper (green/course, grey/medium and then blue/fine), and putting wrapping the strip over the top of an undersized blank section that will fit into the female. Then the inside of the female can be reemed/polished out with the 3M paper.
Part 9. Making the Ferrules - Final Steps and Maintenance
Sealing the Male
The best way to seal and finish the male that I have found is with a few coats of Gorilla Glue. If the whole rod is Gorilla Glue Finished, it's just a matter of finishing the whole butt section as normal. If you are varnish finishing the rod, you will need to leave the Male Slide are unvarnished and Gorilla Glue finish this separately. (Varnish isn't resilient enough to use for the slide area, and will wear, and leave residue inside the ferrule after any amount of use).
Registration Mark
To verify that your ferrule has a full fit/engagement, you can make a "Registration Mark" across the male, which lines up with the lip of the Female when the ferrule is fully engaged. The Registration Mark can be sealed with a final extra coat or two of Gorilla Glue
Ferrule Plugs
Ferrule plugs can be made for ferrules by finding a blank section offcut which comfortably fits the female (better that it is slightly on the loose side that a super tight fit). The offcut should be longer than the slide length of the ferrule, to have some working room outside the ferrule where a plug head can be mounted. Make a mark across the blank offcut where it lines up with the female ferrule mouth. The slide are of the male of the ferrule plug can then be gently chucked up in a lathe, and the outside of the plug can be turned round beyond the slide area mark. This turned down round section can be glued into a drilled piece of timber etc and then the timber turned down into a plug head. It can be useful to drill through the plug head to make a lanyard for the ferrule. The lanyard can help if the plug ever gets stuck in the ferrule. A pen or other item can by hooked into the lanyard to help to remove the plug. But a loose-ish plug, with some wax to hold it in place, is preferable, like a relaxed ferrule, with a little wax rather than a super tight fit.
Maintenance
Keep everything clean, with a light dressing of soap or wax on the Male Slide if required. The inside of the female can be cleaned out with turps or appropriate solvent on a cotton bud. In high humidity environments, ferrules may become tighter over time. It's always best not to "force" them in if they resist. It's better to live with a less than full engagement, with a little wax, than jamming the ferrule in with a hard push, and then not being able to separate the sections.
Some lessons from from failures
To date I have had 2 failures, both on bottom ferrule on 4-piece rods. Both were while being cast more "brutally" than normal fishing should dictate. I suspect that ferrules had worked partially loose before the actual breakage. One was bound in Kevlar, with minimal spiral wrap, so see how much was needed (obviously more)! Other was bound in YLI 50 (which silk). Neither had the extra band of wrap at the Ferrule Mouth. Since then I have had no failures with the ferrules. Both ferrules were easily repaired with rebinding and the additional wrap at the ferrule mouth.
Expansion in wet and humid conditions - Ferrules getting tighter and not fully seating
After use in rain, and immersion in water, I have had some ferrules start to come up tight after sustained use, and temporary less than full engagement of the ferrule on re assembly. This hasn't effected the performance of the ferrules. It has lead me to feel that a relaxed fit with some room for wax is a better approach than aiming for a super tight fit from the beginning.
Future Possibilities
Prefab Ferrules
I think that there is scope to prefab ferrules, glueing them up before placing on the blank and just leaving the Tab Area unbound, for later attachment to the blank (similar to Nickel Silver ferrules). This would provide scope for larger scale prefabrication of ferrules in set sizes. I have made prototypes of these, which show promise, but not fully explored the idea.
Tip Into Butt Style
I've made some rods with the male on the Tip, and Female on the the Butt section. This was mostly to replicate the look of rods with Nickel Silver Ferrules. It involves revising the taper at the bottom of the tip, to form a tapered male, and also some tweaking of the ferrule design. It worked quite well but I'm not convinced that the extra work is worth the effort.
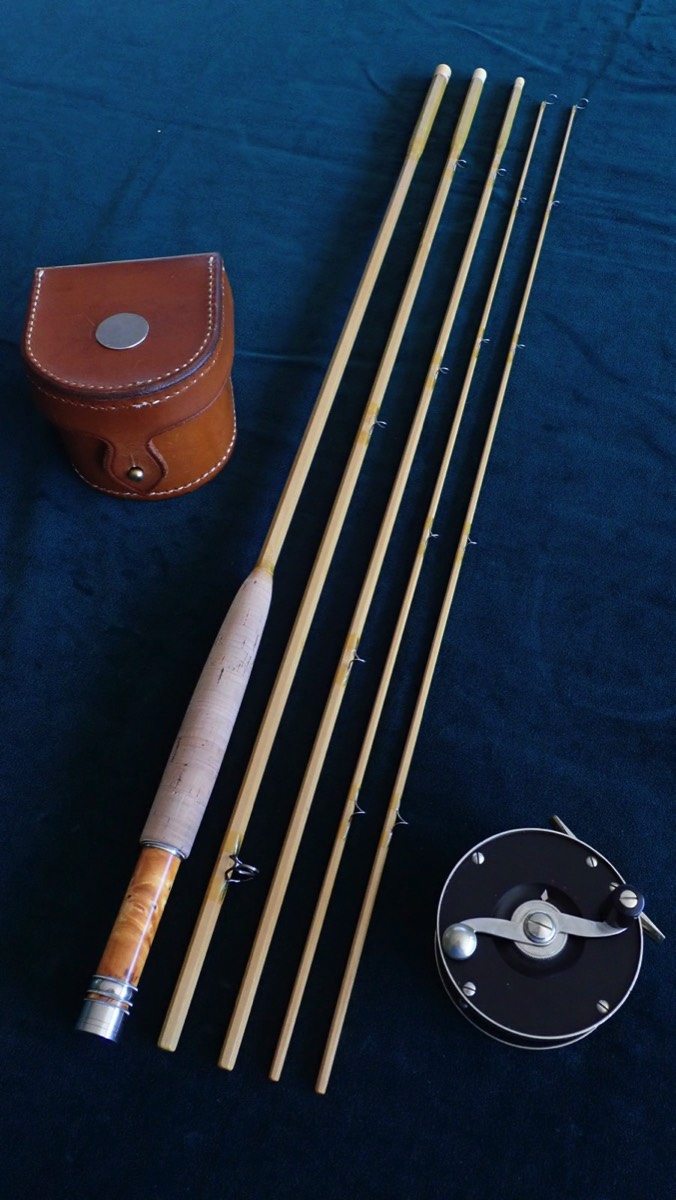
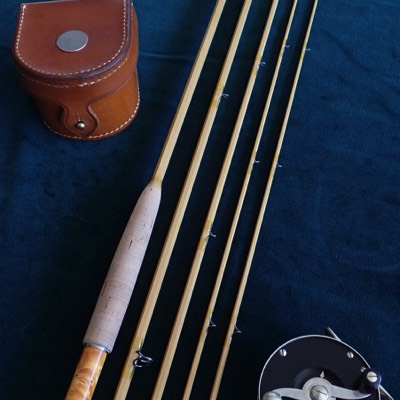
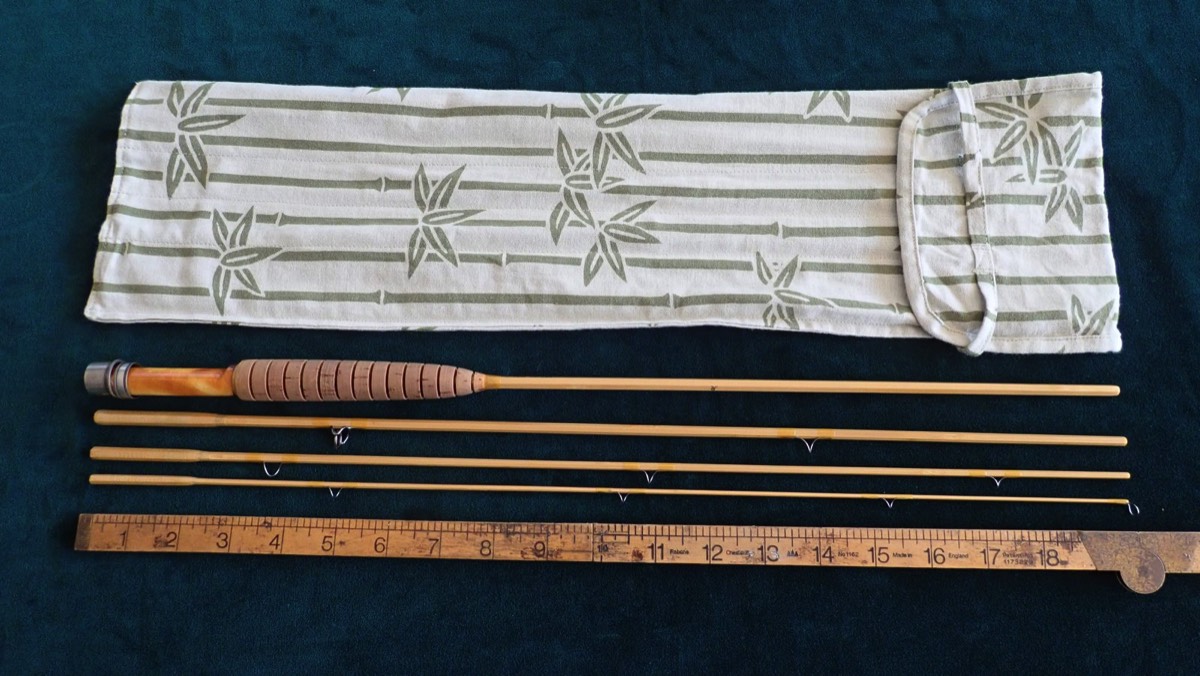
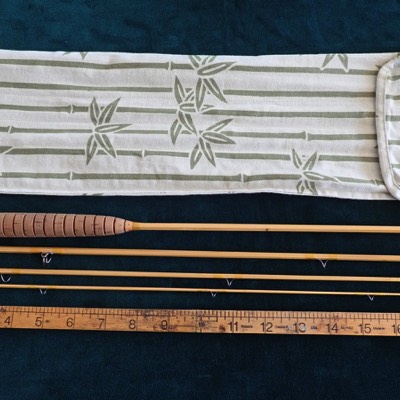
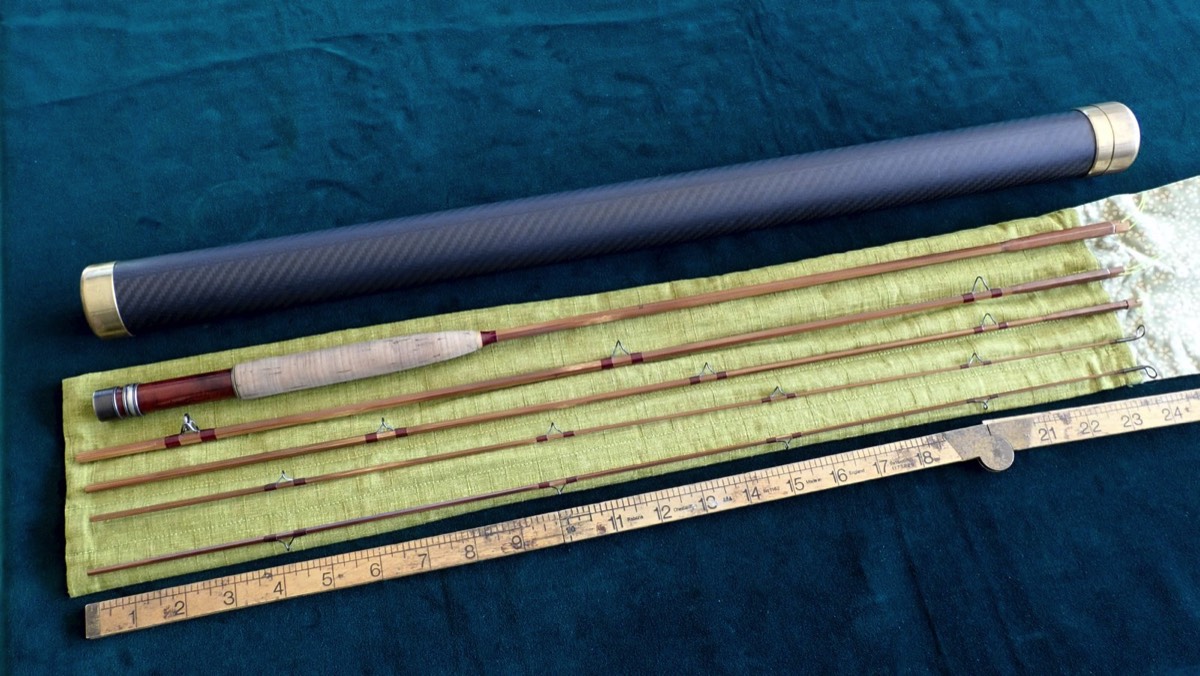
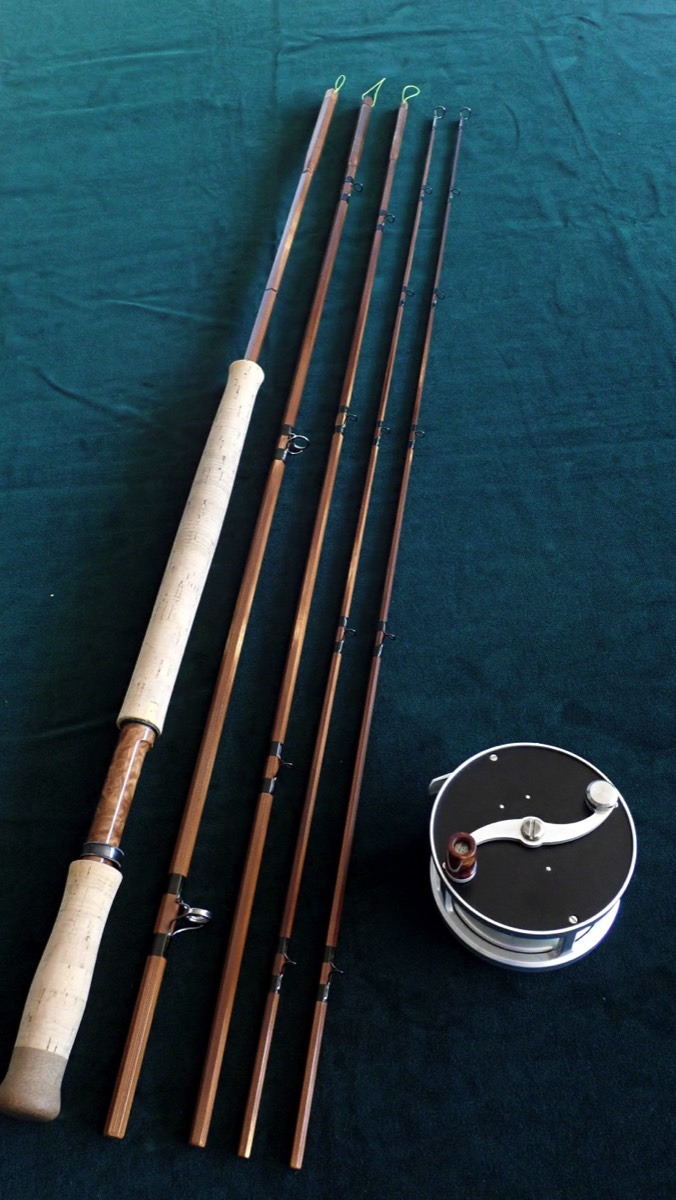
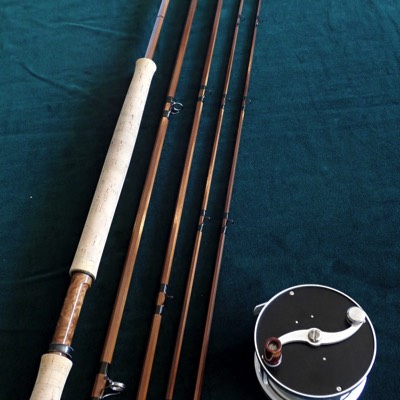
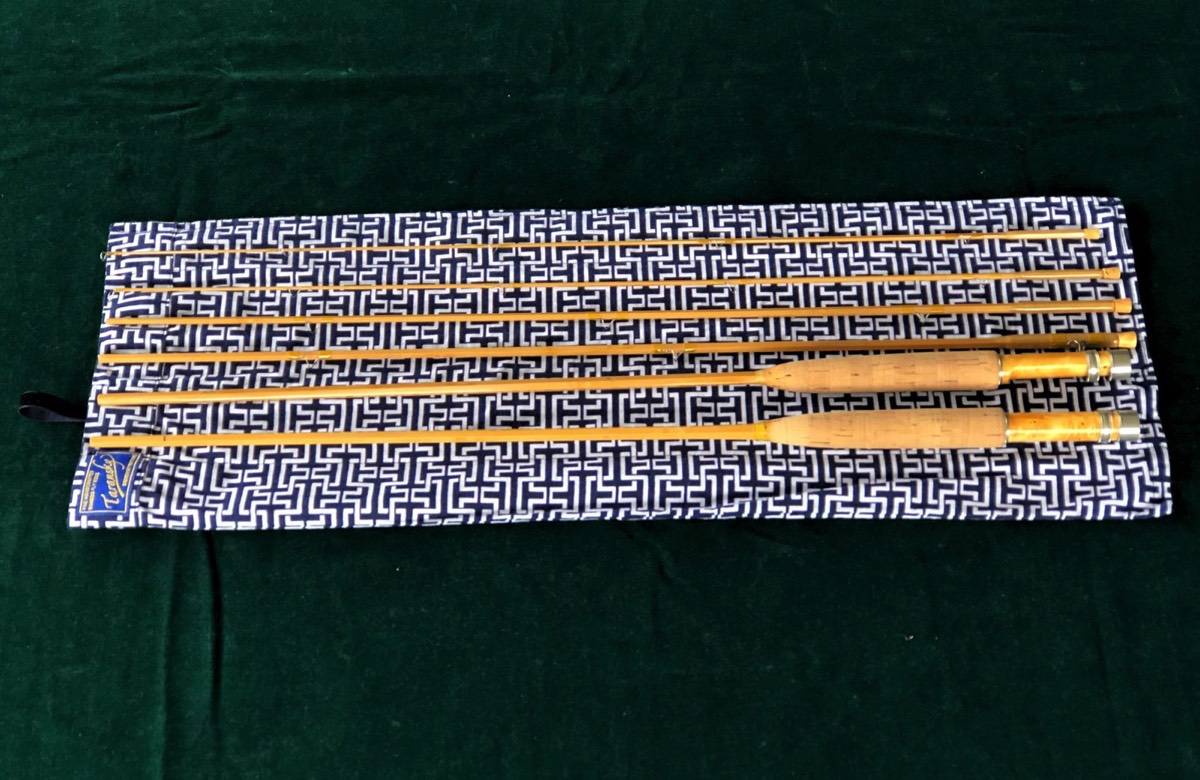
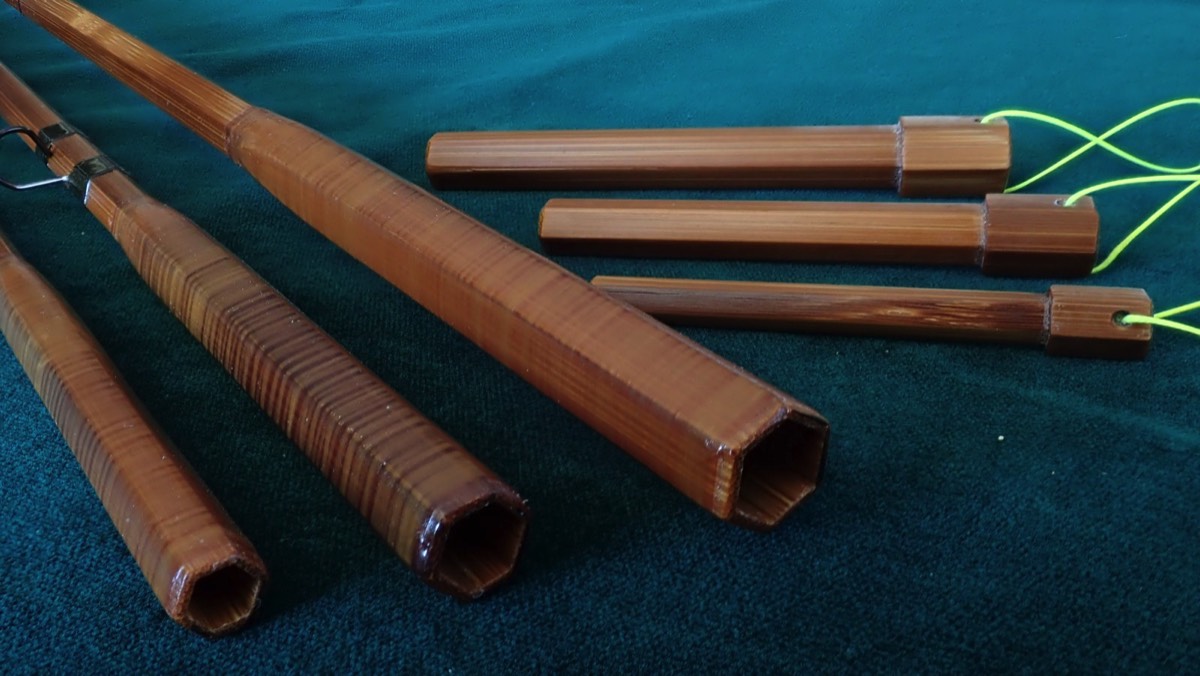
Gallery
Some completed rods